Friday, August 30, 2013
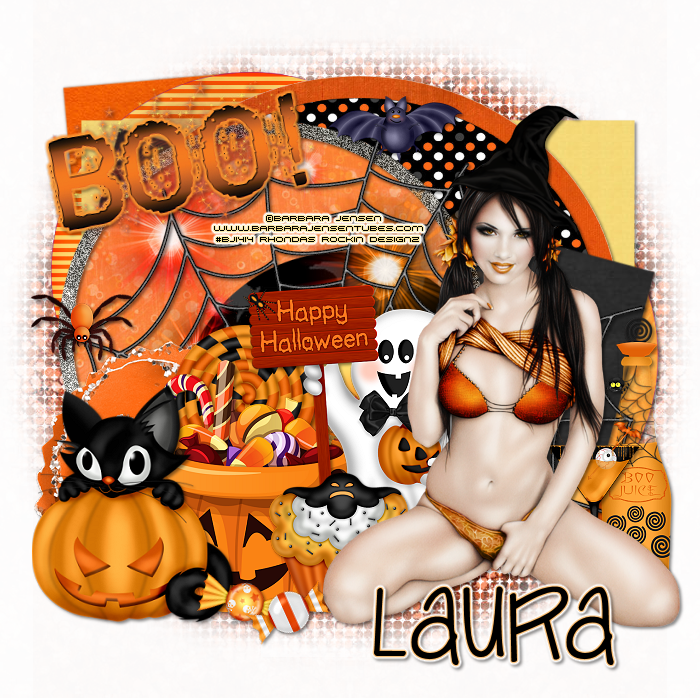
Supplies Needed:
Tube of choice: Im using the wonderful art work of Barbara Jensen
You can purchas these tubes at her store HERE
PTU Scrap Kit by Laura from Tiny Turtle Design called "Ghastly Dreams"
You an purchase this awesome kit at her store HERE
Template #18 from Cakes HERE
Mask of choice
Don't forget to leave a thank you when downloading
Xero Radiance
Open template - Shift D to duplicate then close out original
Resize template 80% all layers
Canvas size 700x700
Delete copyright,wordart & star
paste a paper of choice from the kit - I used paper47
selection invert delete
select none delete the original
paste a paper of choice from the kit - I used paper46
selection invert delete
select none delete the original
paste a paper of choice from the kit - I used paper12
selection invert delete
select none delete the original
paste a paper of choice from the kit - I used paper48
selection invert delete
select none delete the original
paste a paper of choice from the kit - I used paper13
selection invert delete
select none delete the original
paste a paper of choice from the kit - I used paper40
selection invert delete
select none delete the original
paste a paper of choice from the kit - I used paper28
selection invert delete
select none delete the original
paste a paper of choice from the kit - I used paper15
selection invert delete
select none delete the original
paste a paper of choice from the kit - I used paper16
selection invert delete
select none delete the original
add noise with settings of choice
paste a paper of choice from the kit - I used paper44
selection invert delete
select none delete the original
apply Xero Radiance
I used the following:
Element 10
Element 40
Element 42
Element 59
Element 66
Element 89
Element 90
Element 93
Element 94
Element 95
Element 100
Element 103
Element 110
Element 111
Element 123
Open paper 7 & apply mask
Add the Copyright and your License Number for the tube
Resize to your liking and save as PNG
This tutorial was created on August 30, 2013 by Rhonda
Any resemblance to another Tag or Tutorial is purely coincidental


Supplies Needed:
Tube of choice: Im using the wonderful art work of Jessica Dougherty
This tube was purchased at CILM which has closed
You can purchase her art at CDO HERE
PTU Scrap Kit by Cindy from Chichi Designz's called "Autumn Calling"
You an purchase this awesome kit HERE
Open blank 700x700 canvas
Open frame and rotate 90 degrees to left
Grab the magic wand and click inside frame
Selections modify expand by 10
Open paper 2 and paste as new layer
Selections invert delete
Move paper under frame
Apply PhotoEffex with settings of choice
apply Xero Radiance with settings of choice
I used the following:
Bird
Brush Sparkle
Fence
Flower 1
Flower Branch
Flower Leaves
Leaves
Mushrooms
Pumpkin
Squirrel
Sparkles
Sunflower
Tree
Walnuts
Web
Add the Copyright and your License Number for the tube
Resize to your liking and save as PNG
This tutorial was created on August 30,2013 by Rhonda
Any resemblance to another Tag or Tutorial is purely coincidental

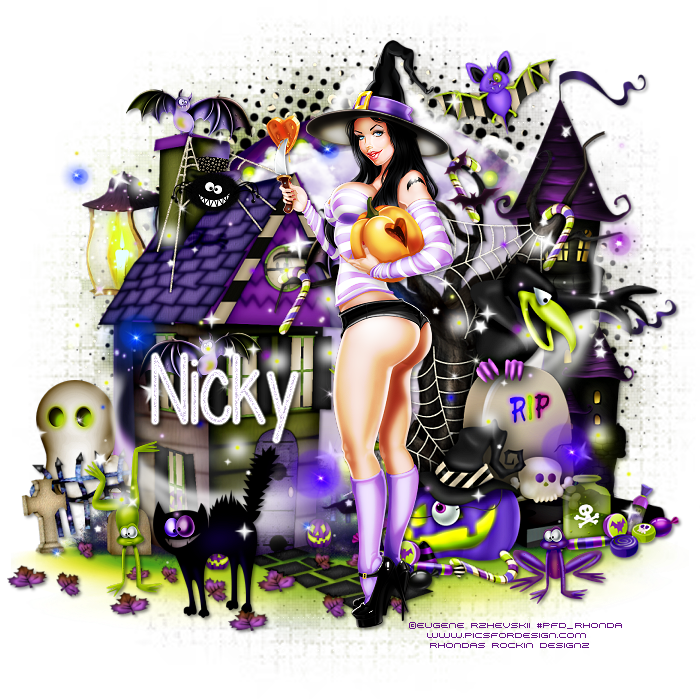
Supplies Needed:
Tube of choice: Im using the wonderful art work of Spazzd Art
You can purchase these tubes HERE
PTU Scrap Kit by Nicky from Inzpired Creationz called "Goth Heart"
You an purchase this awesome kit HERE
Template by Nicky HERE
Don't forget to leave a thank you when downloading
Open template - Shift D to duplicate then close out original
Resize template 90% with all layers checked
Canvas 700x700
Delete copyright,wordart,white & black strips & dots
paste a paper of choice from the kit - I used paper4
selection invert delete
select none delete the original
paste a paper of choice from the kit - I used paper12
selection invert delete
select none delete the original
paste a paper of choice from the kit - I used paper13
selection invert delete
select none delete the original
paste a paper of choice from the kit - I used paper11
selection invert delete
select none delete the original
paste a paper of choice from the kit - I used paper3
selection invert delete
select none delete the original
paste a paper of choice from the kit - I used paper5
selection invert delete
select none delete the original
paste a paper of choice from the kit - I used paper9
selection invert delete
select none delete the original
I used the following:
Branch 2&3
Cardboard 1
Door
Flower 1&2
Flowers 1,2&3
Grass & Skulls
Grass
Grave
Grunge Smear 1
Vials
WA 3
Add the Copyright and your License Number for the tube
Resize to your liking and save as PNG
This tutorial was created on August 30,2013 by Rhonda
Any resemblance to another Tag or Tutorial is purely coincidental
Thursday, August 29, 2013

Supplies Needed:
Tube of choice: Im using the wonderful art work of Ted Hammond
This tube was purchased at CILM which has closed
You must obtain a license to use his art at CDO HERE
PTU Scrap Kit from Designs by Sarah called "Nerdy Cutie"
You an purchase this awesome kit at Pimp My Tags With Scraps HERE
Xero Radiance
Open blank canvas 700x700
Open frame 1 resize & position in center
Grab the magic wand and click inside frame
Selections modify expand by 6
Open paper 3 and place under frame
Selections invert delete
Apply Xero Radiance with settings of choice
I used:
Books
Button 1
Camera
Flower 4
Heart
Phone
String 2
Open backdrop 2 duplicate & mirror
Open Print 1&3 and apply to backdrop
Add the Copyright and your License Number for the tube
Resize to your liking and save as PNG
This tutorial was created on August 27,2013 by Rhonda
Any resemblance to another Tag or Tutorial is purely coincidental
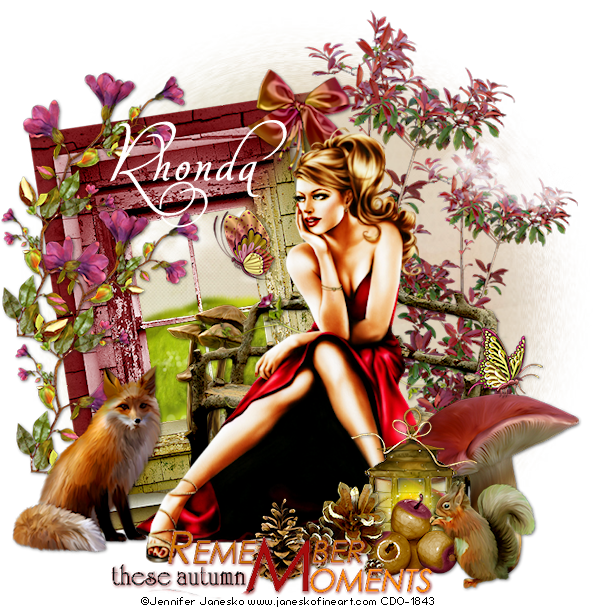
Tuesday, August 27, 2013

Supplies Needed:
Tube of choice: Im using the wonderful art work of Jennifer Janesko
This tube was purchased at CILM which has cloed
You must obtain a license to use her art now at CDO HERE
PTU Scrap Kit by Devilish Dezines Scraps called "Memories"
You an purchase this awesome kit at Designer Scraps HERE
Mask #23 by Gems Taggin Scraps HERE
Don't forget to leave a thank you when downloading
Open blank canvas 700x700
Open frame 1 & place in center - resize to liking
Grab the magic wand & click inside the frame
Selections modify expand by 5
Open paper 3 and paste as new layer
Selections Invert Delete
Move paper under frame
I used:
Element 1
Element 2
Element 13
Element 23
Element 37
Element 38
Element 44
Element 46
Element 49
Element 50
Open paper 2 and apply mask
Apply Filters Unlimited Texture
Add new layer and flood fill with color of choice
Apply another mask of choice
Add the Copyright and your License Number for the tube
Resize to your liking and save as PNG
This tutorial was created on August 27,2013 by Rhonda
Any resemblance to another Tag or Tutorial is purely coincidental

Supplies Needed:
No tube neede for this tutorial
PTU Scrap Kit by Jen from Sweet Temptations called "A Family Af-fair"
You an purchase this awesome kit HERE
Bottom Template by Jus Graphix HERE
Mask #8 by Chrissy Chaos HERE
Don't forget to leave a thank you when downloading
Open template - Shift D to duplicate then close out original
Resize all layers 90%
Canvas size 700x700
delete copyright, layers 8,9,& 10
paste a paper of choice from the kit - I used paper7
selection invert delete
select none delete the original
paste a paper of choice from the kit - I used paper10
selection invert delete
select none delete the original
paste a paper of choice from the kit - I used paper8
selection invert delete
select none delete the original
paste a paper of choice from the kit - I used paper4
selection invert delete
select none delete the original
paste a paper of choice from the kit - I used paper5
selection invert delete
select none delete the original
paste a paper of choice from the kit - I used paper3
selection invert delete
select none delete the original
paste a paper of choice from the kit - I used paper6
selection invert delete
select none delete the original
I used the following:
Ball Toss
Balloon Darts
Balloon
Clown 2&4
Duck Shot
Elephant 4
Popcorn
Ticket Booth
Train
Open paper 4 & apply mask
Add the Copyright and your License Number for the tube
Resize to your liking and save as PNG
This tutorial was created on August 27,2013 by Rhonda
Any resemblance to another Tag or Tutorial is purely coincidental
Monday, August 26, 2013

Supplies Needed:
Tube of choice: Im using the wonderful art work of Very Many
You can purchas these tubes at PFD HERE
PTU Scrap Kit by Laura from Tiny Turtle Design called "Autumn Harvest"
You an purchase this awesome kit at her store HERE
Template #53 from Flaminsal HERE
Mask #1 by Millie HERE
Don't forget to leave a thank you when downloading
Xero Radiance
Open template - Shift D to duplicate then close out original
Delete copyright & wordart
paste a paper of choice from the kit - I used paper3
selection invert delete
select none delete the original
paste a paper of choice from the kit - I used paper20
selection invert delete
select none delete the original
paste a paper of choice from the kit - I used paper23
selection invert delete
select none delete the original
paste a paper of choice from the kit - I used paper14
selection invert delete
select none delete the original
paste a paper of choice from the kit - I used paper12
selection invert delete
select none delete the original
add noise with settings of choice
paste a paper of choice from the kit - I used paper17
selection invert delete
select none delete the original
paste a paper of choice from the kit - I used paper9
selection invert delete
select none delete the original
paste a paper of choice from the kit - I used paper7
selection invert delete
select none delete the original
paste a paper of choice from the kit - I used paper2
selection invert delete
select none delete the original
apply Xero Radiance
I used the following:
Element 1
Element 7
Element 8
Element 19
Element 22
Element 26
Element 29
Element 31
Element 38
Element 63
Element 71
Element 73
Element 91
Element 100
Element 119
Element 128
Merge your layers
Open paper 10 & apply mask
I added a weave effect to my mask
Add the Copyright and your License Number for the tube
Resize to your liking and save as PNG
This tutorial was created on August 26, 2013 by Rhonda
Any resemblance to another Tag or Tutorial is purely coincidental

Supplies Needed:
Tube of choice: Im using the wonderful art work of Keith Garvey
You can purchase his work at his store HERE
PTU Scrap Kit by Nicky from Inzpired Creationz called "Rock Hard"
You an purchase this awesome kit from Pimp My Tags W/Scraps Store HERE
FTU Cluster Frame from PSPers Delite HERE
Open blank canvas 700x700
Open cluster frame shift D to duplicate & close original
Place as new layer in center of canvas
Open frame 1 resize and place behind cluster frame
Grab the magic wand and click inside cluster
Selections modify expand by 8
Open paper 4 & paste into selections
Move paper under frame
Place your main tube
Xero Radiance with settings of choice
I used the following:
Bow 1
Drums
Drumsticks
Halftone 1
Kiss 2
Lightray
Sparkles 3
Splatter 2
VIP Pass
Add the Copyright and your License Number for the tube
Resize to your liking and save as PNG
This tutorial was created on August 24,2013 by Rhonda
Any resemblance to another Tag or Tutorial is purely coincidental
Saturday, August 24, 2013

Supplies Needed:
Tube of choice: Im using the wonderful art work of Jessica Dougherty
I purchased this tube from CILM which has now closed
You must obtain a license to use these tubes at CDO HERE
PTU Scrap Kit by Laura from Tiny Turtle Design called "Bite Me"
You an purchase this awesome kit at her store HERE
FTU Cluster to match this kit by Sweet Temptations HERE
Mask #1 by Dangerously Delicious Designz HERE
Open blank canvas 700x700
Open cluster frame & paste as new layer
Grab freehand tool & draw around frame
Open paper 22 & paste as new layer
Selections invert delete
Move paper under frame
Place your main tube inside frame
Add Xero Radiance with settings of choice
I used:
Element 26
Element 47
Element 58
Element 102
Open paper 26 and apply mask
Add Weave Effect to mask layer
Add the Copyright and your License Number for the tube
Resize to your liking and save as PNG
This tutorial was created on August 24,2013 by Rhonda
Any resemblance to another Tag or Tutorial is purely coincidental
Thursday, August 22, 2013


Supplies Needed:
Tube of choice: Im using the wonderful art work of Ninaste
You can purchase this tube at SATC HERE
PTU Scrap Kit by Distrubed Scraps called Naughty Schoolgirl
You can purchase this kit at SATC HERE
Template #359 by Missy HERE
Don't forget to leave a thank you when downloading
Xero Radiance
Penta Drag
PhotEffex Scanlines
Open template - Shift D to duplicate then close out original
Canvas size 700x700
Deleted copyright & wordart
paste a paper of choice from the kit - I used paper1
selection invert delete
select none delete the original
paste a paper of choice from the kit - I used paper4
selection invert delete
select none delete the original
paste a paper of choice from the kit - I used paper10
selection invert delete
select none delete the original
paste a paper of choice from the kit - I used paper2
selection invert delete
select none delete the original
paste a paper of choice from the kit - I used paper9
selection invert delete
select none delete the original
paste a paper of choice from the kit - I used paper10
selection invert delete
select none delete the original
paste closeup of tube inside frame
apply Xero radinace with setting of choice
select none delete the original
Xero Radiance with settings of choice
I used the following:
Element 28
Element 31
Element 32
Element 33
Element 38
Element 41
Element 43
Element 50
Element 52
Element 56
Element 60
Element 63
Element 68
Element 73
Element 80
Element 107
Element 122
Element 126
Add the Copyright and your License Number for the tube
Resize to your liking and save as PNG
This tutorial was created on August 22,2013 by Rhonda
Any resemblance to another Tag or Tutorial is purely coincidental

Supplies Needed:
Tube of choice: Im using the wonderful art work of Amy Matthews
You can purchase her art at CDO HERE
PTU Scrap Kit by Cindy from Chichi Designz's called "IB Anna Marine 7-2"
You an purchase this awesome kit HERE
Sparkle Mask from Farm Fresh Designs HERE
Open blank 700x700 canvas
Open arch & place in center
Open scenery and place at bottom of arch
Grab the freehand tool & draw around arch& scenery
Open paper 4 and paste as new layer
Selections invert delete
Move paper under arch & scenery
I used the following:
Branch
Butterflies 2
Clouds
Fog
Lantern
Roses
Open paper 3 and apply mask
Add the Copyright and your License Number for the tube
Resize to your liking and save as PNG
This tutorial was created on August 22,2013 by Rhonda
Any resemblance to another Tag or Tutorial is purely coincidental
Sunday, August 18, 2013

Supplies Needed:
Tube of choice: Im using the wonderful art work of Eugene Rzhevskii
You can purchase his tubes at PFD HERE
PTU Scrap Kit by Jen from Sweets Temptations called "Spell Binding"
You an purchase this awesome kit HERE
Template #87 by Rose HERE
Don't forget to leave a thank you when downloading
Plugins Used:
Xero Radiance
PhotoEffex Scanlines
Open template - Shift D to duplicate then close out original
Canvas size 700x650
I deleted copyright & pink tones
paste a paper of choice from the kit - I used paper6
selection invert delete
select none delete the original
paste a paper of choice from the kit - I used paper1
selection invert delete
select none delete the original
paste a paper of choice from the kit - I used paper9
selection invert delete
select none delete the original
paste a paper of choice from the kit - I used paper10
selection invert delete
select none delete the original
paste a paper of choice from the kit - I used paper8
selection invert delete
select none delete the original
add closeup of tube you are using
selections invert delete
Add Xero Radiance with settings of choice
Add PhotoEffex Scanlines with settings of choice
Xero radiance with settings of choice
I used the following:
Bat
Cupcake
Ghost
Ghosts
Kitty
Scythe
Spider
Witch Shoe
Merge your layers
Add the Copyright and your License Number for the tube
Resize to your liking and save as PNG
This tutorial was created on October 14,2012 by Rhonda
Any resemblance to another Tag or Tutorial is purely coincidental

Supplies Needed:
No artist tube used
FTU Exclusive Scrap Kit by Jen from Sweets Temptations
You can download this awesome kit HERE
Template# 3 from Melissa which can be downloaded HERE
Exclusive mask from Vesta which can be downloaded HERE
Don't forget to leave a thank you when downloading
Open template - Shift D to duplicate then close out original
deleted copyright & dotted lines
we will working from the bottom up
paste a paper of choice from the kit - I used paper1
selection invert delete
select none delete the original
add solid color of choice
add noise with settings of choice
selection invert delete
select none delete the original
paste a paper of choice from the kit - I used paper7
selection invert delete
select none delete the original
add a new layer and flood fill with white
add noise with settings of choice
selection invert delete
select none delete the original
add a new layer and flood fill with solid color
add noise with settings of choice
selection invert delete
select none delete the original
Add noise to the stars layer
I used the following:
Bats
Books
Candy Pumpkin
Coffin
Cupcake
Ghost
Both Grims
Haunted House
Kitty
owl
Tree 2
Winged Skull
Add mask of choice
Resize to your liking and save as PNG
This tutorial was created on October 19,2012 by Rhonda
Any resemblance to another Tag or Tutorial is purely coincidental

Supplies Needed:
Tube of choice: Im using the wonderful art work of Ismael Rac
Which you must obtain a license to use at his store HERE
FTU Scrap Kit by Jen from Sweet Temptations called "Christmas Candy"
You can download this awesome kit HERE
Template by Millie HERE
Mask of choice
Don't forget to leave a thank you when downloading
Xero Radiance
Open template - Shift D to duplicate then close out original
Resize template 90% all layers
Canvas size 700x700
delete copyright, rasters 5,8&9
paste a paper of choice from the kit - I used paper5
selection invert delete
select none delete the original
paste a paper of choice from the kit - I used paper1
selection invert delete
select none delete the original
paste a paper of choice from the kit - I used paper6
selection invert delete
select none delete the original
paste a paper of choice from the kit - I used paper3
selection invert delete
select none delete the original
add new layer & flood fill with solid color
select none delete the original
add new layer & flood fill with another solid color
select none delete the original
add noise and glow
Xero Radiance with settings of choice
I used the following:
Bow
Box 1
Candycane 1
Cupcake 1
Flowers 1
Frame 1
Gifts 1,2&3
Ginger
Lollipop 4
Mug
Tree
Open paper 2 and apply mask
Add the Copyright and your License Number for the tube
Resize to your liking and save as PNG
This tutorial was created on August 18, 2013 by Rhonda
Any resemblance to another Tag or Tutorial is purely coincidental

Supplies Needed:
Tube of choice: Im using the wonderful art work of Elias Chatzoudis
This tube was purchased at MPT which has closed
You can now purchase his tubes at his store HERE
PTU Scrap Kit from Pimp'd Designz called "Sweeter Than Honey"
You an purchase this awesome kit at Pimp My Tags With Scraps HERE
Mask of choice
Open blank canvas 700x700
Open frame 3 and place in center
Click inside frame with magic wand
Selections modify expand by 4
Open paper 12 & paste as new layer
Selections invert delete
Move paper under frame
Xero Radiance with settings of choice
I used:
Bee
Bee Hive
Flower 4
Greenery
Honey Drips
Honey Jar
Honey Wand
Print 2
Ribbon 1&2
Open paper 5 & apply mask of choice
Add the Copyright and your License Number for the tube
Resize to your liking and save as PNG
This tutorial was created on August 18,2013 by Rhonda
Any resemblance to another Tag or Tutorial is purely coincidental

Supplies Needed:
Tube of choice: Im using the wonderful art work of Pinup Toons
You must obtain a license to use at CDO HERE
PTU Scrap Collab Kit from Designs by Sarah called "Fall Fantasy"
You an purchase this awesome kit at Pimp My Tags With Scraps HERE
Template #48 by TwyztedT's Playroom HERE
Mask of choice
Xero Radiance
Toadies Band Suppress Noise
Open template - Shift D to duplicate then close out original
Resize all layers 90%
Canvas size 700x700
delete copyright, raster 5,copy of raster 5 & dotted circle
paste a paper of choice from the kit - I used paper4
selection invert delete
select none delete the original
paste a paper of choice from the kit - I used paper1
selection invert delete
select none delete the original
paste a paper of choice from the kit - I used paper8
selection invert delete
select none delete the original
paste a paper of choice from the kit - I used paper7
selection invert delete
select none delete the original
paste a paper of choice from the kit - I used paper5
selection invert delete
select none delete the original
paste a paper of choice from the kit - I used paper2
selection invert delete
select none delete the original
Place your main tube
Xero Radiance with settings of choice
I used the following:
Branch
Butterfly
Dragonfly
Elk
Flower 1
Leaf 1,3,4,5
Leaves 1&2
Mushrooms 2&3
Plant 1,2,3
Ribbon 2
Sparkles 2
Open paper 5 & apply mask of choice
Add the Copyright and your License Number for the tube
Resize to your liking and save as PNG
This tutorial was created on August 18,2013 by Rhonda
Any resemblance to another Tag or Tutorial is purely coincidental

This tutorial is written for those with knowledge of PSP
Supplies Needed:
Tube of choice: Im using the wonderful art work of Ted Hammond
You can purchase his tubes at CDO HERE
PTU Scrap Kit by Nicky from Inzpired Creationz called "Insane Asylum"
You an purchase this awesome kit from Pimp My Tags W/Scraps Store HERE
FTU Cluster by Chilipepper Spiced HERE
Mask of choice
Open cluster frame shift D to copy
Close original
Resize 90% all layers
Canvas size 700x700
Grab the magik wand and click inside frame
Selections modify by 6
Open room element & place in frame where desired
selections invert delete
Move paper under frame
Open frame 2 resize & place behind cluster
Place your main tube in front
I used the following:
Blood Splatter
Candle
Crow
Grass
Handprint
heart 1
Lightening 1
Meds 1
needle
Roses
Sign 2
Skulls
Sparkle 2
Open paper 15 & apply mask
Add the Copyright and your License Number for the tube
Resize to your liking and save as PNG
This tutorial was created on August 18,2013 by Rhonda
Any resemblance to another Tag or Tutorial is purely coincidental
Supplies Needed:
Tube of choice: Im using the wonderful art work of Eugene Rzhevskii
You can purchase his tubes at PFD HERE
PTU Scrap Kit by Nicky from Inzpired Creationz called "Halloween City"
You an purchase this awesome kit from Pimp My Tags W/Scraps Store HERE
Mask #30 by Chrissy Chaos HERE
Xero Radiance
Open blank canvas 700x700
Open frame 2 and resize to your liking
Grab the magik wand and click inside frame
Selections modify by 6
Open paper 1 selections invert delete
Move paper under frame
Place your main tube
Xero Radiance with settings of choice
I used the following:
Bat2&3
Castle
Cat 2
Clouds
Cluster
Fog 1
Frog 1&2
Ghost 1
Grass 2
House
Lamp
Sparkles 1&4
Spider
Open paper 10 & apply mask
Add the Copyright and your License Number for the tube
Resize to your liking and save as PNG
This tutorial was created on August 18,2013 by Rhonda
Any resemblance to another Tag or Tutorial is purely coincidental
Saturday, August 17, 2013

Supplies Needed:
Tube of choice: Im using the wonderful art work of Elias Chatzoudis
Which you must obtain a license to use at his store HERE
FTU Scrap Kit by Amy from Gimptastic Tuts HERE
FTU Cluster frame by Gemini Ramblings HERE
Mask #157 by Vaybs HERE
Don't forget to leave a thank you when downloading
Xero Radiance
PhotoEffex Scanlines
Open cluster frame and duplicate - close original
Canvas 700x700
Click in the filmstrips and add closeup of tubes
apply Xero Radinace with settings of choice
apply Xero Radinace again
I used the following:
Baton
Bottle
Bracelet
Button
Deco 1
Explicit
Lable
Star
Open paper 1 and apply mask of choice
Add the Copyright and your License Number for the tube
Resize to your liking and save as PNG
This tutorial was created on August 17,2013 by Rhonda
Any resemblance to another Tag or Tutorial is purely coincidental

Supplies Needed:
Tube of choice: Im using the wonderful art work of The Hunter
You must obtain a license to use this art at SATC HERE
PTU Scrapkit by Nicky from Inzpired Creationz called "Sweet Steampunk"
You an purchase this awesome kit from Pimp My Tags W/Scraps Store HERE
Mask of choice
Xero Radiance
Mura's Meister Copies
This is a very quick and easy tutorial
Open blank 700x700 canvas
Open Frame 3 & paste as a new layer
Grab the magik wand & click inside frame
Open paper 10 from kit and paste as new layer
Selections invert delete
Move paper under frame
Using a pixel font write out what you want inside frame
Objects align center in canvas
Convert to raster layer
apply Mura Meister Filter copies
selections invert delete wording
Place your tube where you want it and build around it
apply Xero Radiance with settings of choice
I used:
Antiseptic
Butterfly 3
Buttons 1&2
Clock 2
Luggage
Ribbon 2&3
Rose 4
Shell
Sparkles 1
Open paper 17 & apply mask
Add the Copyright and your License Number for the tube
Resize to your liking and save as PNG
This tutorial was created on August 17,2013 by Rhonda
Any resemblance to another Tag or Tutorial is purely coincidenta
Friday, August 16, 2013

Supplies Needed:
Tube of choice: Im using the wonderful art work of Alex Prihodko
You must obtain a license to use at Pics for Design HERE
PTU Scrap Kit by Laura from Tiny Turtle Design called "Secret Forrest"
You an purchase this awesome kit at her store HERE
Mask #230 from Weescotslass Creations HERE
Downloads are on the right hand side of blog
Xero Radiance
Open blank canvas 700x700
Open element 9 - resize and place in center of canvas
Open element 8 and place behind waterfall
Place your main tube
Add Xero Radiance with settings of choice
I used:
Element 14
Element 29
Element 30
Element 34
Element 35
Element 41
Element 45
Element 54
Element 58
Element 59
Element 63
Element 64
Element 73
Element 75
Element 92
Element 113
Element 122
Open paper 6 & apply mask
Add the Copyright and your License Number for the tube
Resize to your liking and save as PNG
This tutorial was created on August 16,2013 by Rhonda
Any resemblance to another Tag or Tutorial is purely coincidental
Tuesday, August 13, 2013

Supplies Needed:
Tube of choice: Im using the wonderful art work of Misticheskaya
Which you must obtain a license to use at SATC HERE
PTU Scrap Kit by Farrah's Design Scraps called "Orange Cream"
You an purchase this awesome kit at Designer Scraps HERE
Mask #78 by Rosesblack HERE
Xero Radiance
Open blank 700x700 image
Open frame & paste as new layer
Grab the magic wand and click inside frame
Selections modify expand by 8
Open paper 6 & paste as new layer
Selections invert delete
Move paper under frame
Apply Xero Radiance with settings of choice
Now time to add our elements
I used the following:
Butterfly
Flower 2
Flower 5
Flower 10,11&12
Orange
Ribbon 2
Scatter 2
Vine 2
Open paper 3 & apply mask
Add the Copyright and your License Number for the tube
Resize to your liking and save as PNG
This tutorial was created on August 13,2013 by Rhonda
Any resemblance to another Tag or Tutorial is purely coincidental
Subscribe to:
Posts
(Atom)
Grab My Blinkie

I CT For


Blogs I Visit


