Sunday, May 22, 2016

This tutorial is written for those with knowledge of PSP
Supplies Needed:
Tube of choice: I'm using the wonderful art work of Karen Middleton
You can purchase this artist work at CDO HERE
PTU Scrapkit by Jen from Sweet Temptations called "Blossoms
You can purchase kit at one of her stores" HERE
Template #62 by Dee HERE
Mask of choice
Don't forget to leave a thank you when downloading
Ok Lets get Started:
Open template - Shift D to duplicate then close out original
Increase canvas size 700x700
Delete copyright,stars,word art,all dotted layers & swirl
Click on purple square selections,select all, float,defloat
paste a paper of choice from the kit - I used paper5
selection invert delete
select none delete the original
Click on blue circle selections,select all, float,defloat
paste a paper of choice from the kit - I used paper10
selection invert delete
select none delete the original
Click on purple rectangle selections,select all, float,defloat
paste a paper of choice from the kit - I used paper9
selection invert delete
select none delete the original
Click on green circle selections,select all, float,defloat
paste a paper of choice from the kit - I used paper8
selection invert delete
select none delete the original
Click on orange circle selections,select all, float,defloat
paste a paper of choice from the kit - I used paper3
selection invert delete
select none delete the original
Click on blue oval selections,select all, float,defloat
paste a paper of choice from the kit - I used paper1
selection invert delete
select none delete the original
Click on green rectangle selections,select all, float,defloat
add new layer and flood fill with a solid gradient of choice
select none delete the original
Place your main tube
Xero Radiance with settings of choice
Now time to add our elements
I used the following:
Bow
Doodle
Flower 2,3&4
Glitter
Hanging Bloom
Kite
Ladder
Leaves
Mushrooms
Owl
Spray
Trike
Vine
Vine 1
Watering Can 1
Well
Merge your layers
Open paper of choice & apply mask
Place your name where you like it
Add the Copyright and your License Number for the tube
Resize to your liking and save as PNG
This tutorial was created on May 22,2016 by Rhonda
Any resemblance to another Tag or Tutorial is purely coincidental

Saturday, May 7, 2016
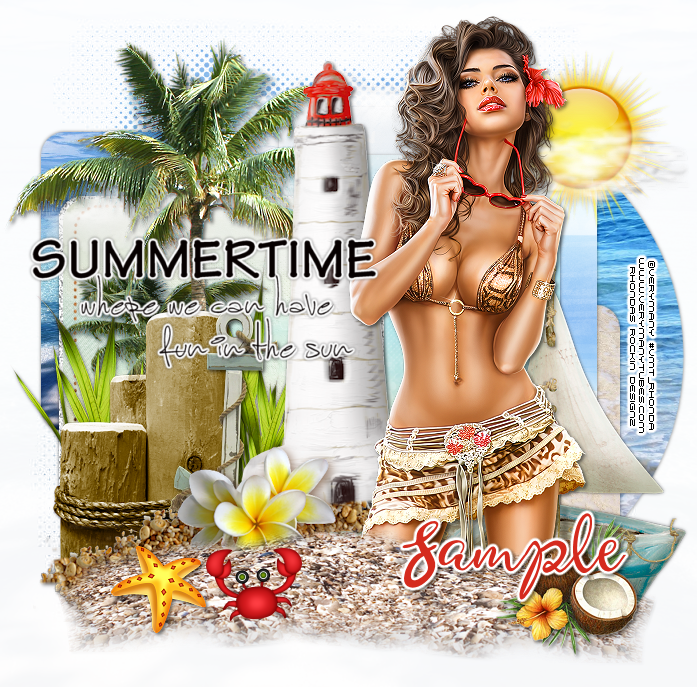
This tutorial is written for those with knowledge of PSP
Supplies Needed:
Tube of choice: I'm using the wonderful art work of VeryMany
Which you must obtain a license to use HERE
PTU Scrapkit by Niqui's Designs called Summer is Here
You can purchase this awesome kit HERE
Template #801 by Millie HERE
Wordart by Millie HERE
Mask #137 by Millie HERE
Ok Lets get Started:
Open template - Shift D to duplicate then close out original
Resize to desired liking
Canvas size 700x700
Delete copyright and word art
Click on raster 1 selections,select all, float,defloat
paste a paper of choice from the kit - I used paper5
selection invert delete
select none delete the original
Click on raster 2 selections,select all, float,defloat
paste a paper of choice from the kit - I used paper9
selection invert delete
select none delete the original
Click on raster 3 selections,select all, float,defloat
paste a paper of choice from the kit - I used paper7
selection invert delete
select none delete the original
Click on raster 4 selections,select all, float,defloat
paste a paper of choice from the kit - I used paper2
selection invert delete
select none delete the original
Click on raster 5 selections,select all, float,defloat
paste a paper of choice from the kit - I used paper8
selection invert delete
select none delete the original
Click on raster 7 selections,select all, float,defloat
paste a paper of choice from the kit - I used paper10
selection invert delete
select none delete the original
Click on raster 8 selections,select all, float,defloat
paste a paper of choice from the kit - I used paper3
selection invert delete
select none delete the original
Place your tube
Xero Radiance with settings of choice
Now time to add our elements
I used the following:
Element 1
Element 11
Element 13
Element 17
Element 21
Element 22
Element 28
Element 41
Element 48
Element 49
Element 53
Merge your layers
Open paper of choice and apply mask
Place your name where you like it
Add the Copyright and your License Number for the tube
Resize to your liking and save as PNG
This tutorial was created on May 7,2016 by Rhonda
Any resemblance to another Tag or Tutorial is purely coincidental
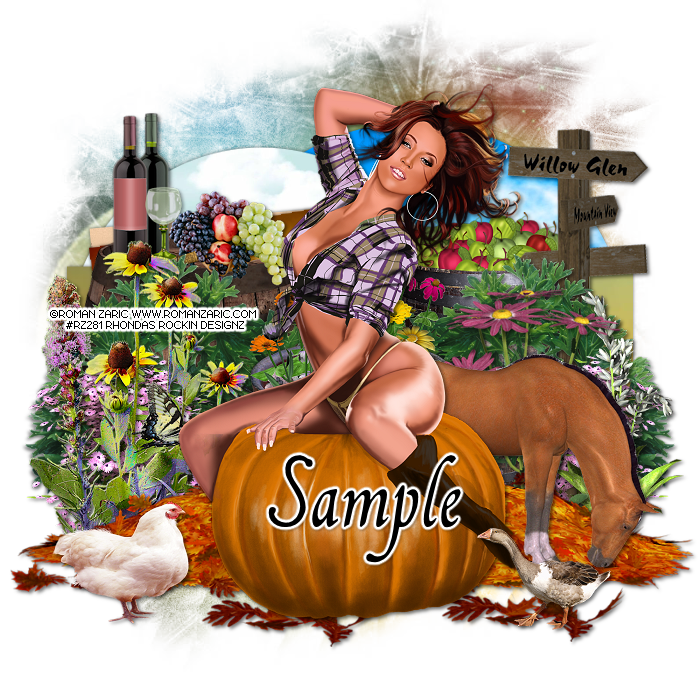
This tutorial is written for those with knowledge of PSP
Supplies Needed:
Tube of choice: I'm using the wonderful art work of Roman Zaric
Which you must obtain a license to use HERE
PTU Scrapkit by Designs by Vi called Pumpkin Spice
You can purchase this awesome kit HERE
You can purchase kit and tube as a bundle
Template #167 by HorsePlay Pastures HERE
Mask of choice
Ok Lets get Started:
Open template - Shift D to duplicate then close out original
Canvas size 700x700
Delete copyright, layers 8&9
Click on raster 1 selections,select all, float,defloat
paste a paper of choice from the kit - I used paper5
selection invert delete
select none delete the original
Click on raster 2 selections,select all, float,defloat
paste a paper of choice from the kit - I used paper9
selection invert delete
select none delete the original
Click on raster 3 selections,select all, float,defloat
paste a paper of choice from the kit - I used paper12
selection invert delete
select none delete the original
Click on raster 4&6 selections,select all, float,defloat
paste a paper of choice from the kit - I used paper10
selection invert delete
select none delete the original
Click on raster 5&7 selections,select all, float,defloat
paste a paper of choice from the kit - I used paper6
selection invert delete
select none delete the original
Place your tube
Xero Radiance with settings of choice
Now time to add our elements
I used the following:
Element 5
Element 6
Element 12
Element 17
Element 22
Element 26
Element 30
Element 35
Element 36
Element 37
Element 40
Element 43
Element 44
Element 50
Element 59
Merge your layers
Open paper of choice and apply mask
Place your name where you like it
Add the Copyright and your License Number for the tube
Resize to your liking and save as PNG
This tutorial was created on May 7,2016 by Rhonda
Any resemblance to another Tag or Tutorial is purely coincidental
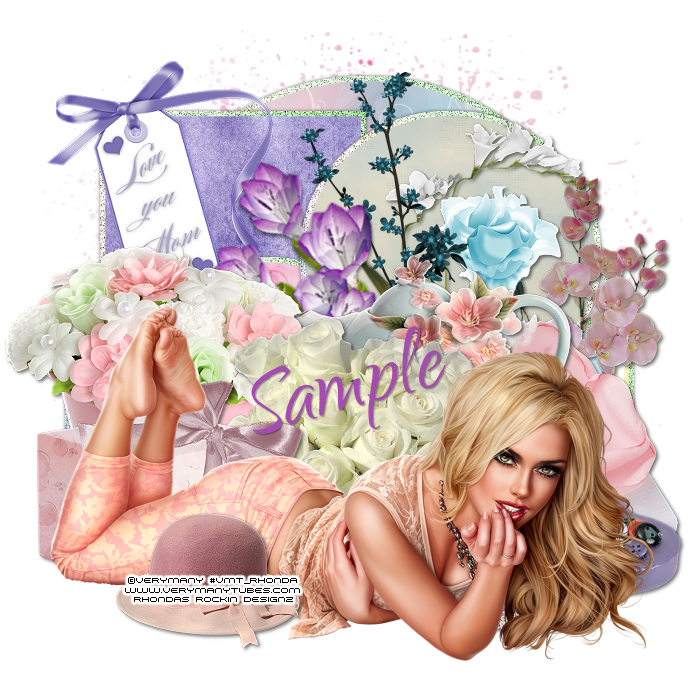
This tutorial is written for those with knowledge of PSP
Supplies Needed:
Tube of choice: I'm using the wonderful art work of VeryMany
You can purchase their work HERE
FTU Scrap Kit by Scrap Dimensions HERE
Template #25 by Just Like Candy Designs HERE
Mask of choice
Don't forget to leave a thank you when downloading
Ok Lets get Started:
Open template - Shift D to duplicate then close out original
Resize template to your liking
Canvas size 700x700
Deleted copyright
Click on center light brown selections,select all, float,defloat
paste a paper of choice from the kit - I used paper8
selection invert delete
select none delete the original
add border with noise
Click on left vertical rectangle selections,select all, float,defloat
paste a paper of choice from the kit - I used paper3
selection invert delete
select none delete the original
add border with noise
Click on middle rectangle selections,select all, float,defloat
paste a paper of choice from the kit - I used paper7
selection invert delete
select none delete the original
add border with noise
Click on right light brown selections,select all, float,defloat
paste a paper of choice from the kit - I used paper1
selection invert delete
select none delete the original
add border with noise
Click on left peach circle selections,select all, float,defloat
paste a paper of choice from the kit - I used paper5
selection invert delete
select none delete the original
add border with noise
Click on right upper brown selections,select all, float,defloat
paste a paper of choice from the kit - I used paper1
selection invert delete
select none delete the original
add border with noise
Place your tube
Xero Radiance with settings of choice
Now time to add our elements
I used the following:
Flowers 2,3,4,5,6&7
Gift Box 1,2&3
Hat
Roses
Tag
Teapot
Merge your layers
Open paper of choice and apply mask
Place your name where you like it
Add the Copyright and your License Number for the tube
Resize to your liking and save as PNG
This tutorial was created on May 7,2016 by Rhonda
Any resemblance to another Tag or Tutorial is purely coincidental

Thursday, May 5, 2016

This tutorial is written for those with knowledge of PSP
Supplies Needed:
Tube of choice: I'm using the wonderful art work of Alex Prihodko
Which you must obtain a license to use HERE
PTU Scrap Kit by Jen from Sweet Temptations called Little Bit Gypsy
You can purchase this kit from one of her stores HERE
Template #172 by Blissfully Beth HERE
Template links are on left hand side of blog
Mask of choice
Don't forget to leave a thank you when downloading
Ok Lets get Started:
Open template - Shift D to duplicate then close out original
Canvas size 700x700
Delete copyright, word art and lines
Click on circle 4 selections,select all, float,defloat
paste a paper of choice from the kit - I used paper8
selection invert delete
select none delete the original
add border with noise
Click on circle 3 selections,select all, float,defloat
paste a paper of choice from the kit - I used paper7
selection invert delete
select none delete the original
add border with noise
Click on circle 1&2 selections,select all, float,defloat
paste a paper of choice from the kit - I used paper5
selection invert delete
select none delete the original
Add close up of tube inside circle 2
Click on circle frame 1&2
Click inside blue circle with magic wand
paste a paper of choice from the kit - I used paper3
selection invert delete
select none delete the original
Place your tube inside circle 1
Now time to add our elements
I used the following:
Ball
Bead
BFly
Bling
Bottle
Bucket
Charm 2
Decor 1&3
DFly
Gypsy
Letter
Telephone
Window
Merge your layers
Open paper 4 and apply mask of choice
Place your name where you like it
Add the Copyright and your License Number for the tube
Resize to your liking and save as PNG
This tutorial was created on May 4,2016 by Rhonda
Any resemblance to another Tag or Tutorial is purely coincidental
Sunday, May 1, 2016
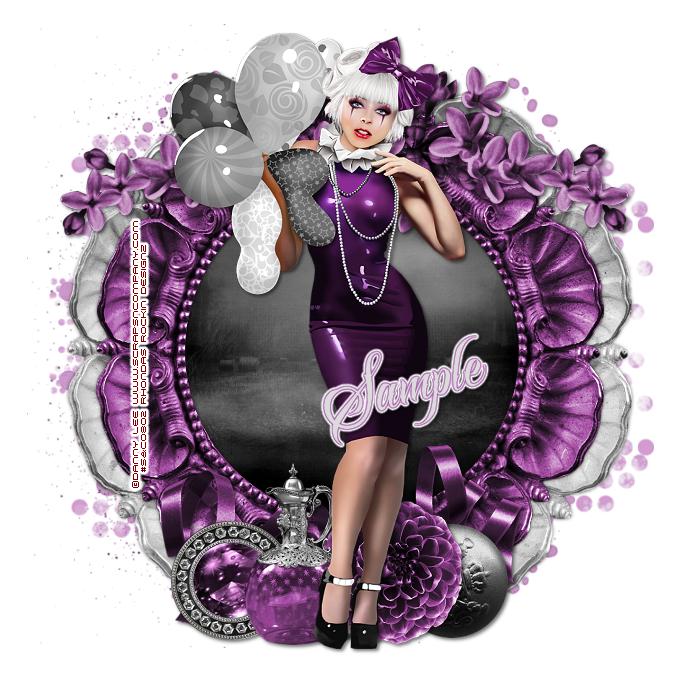
This tutorial is written for those with knowledge of PSP
Supplies Needed:
Tube of choice: I'm using the wonderful art work of Danny Lee
You must obtain a license to use this art at S&Co HERE
FTU Scrapkit from Carita Creationz HERE
Ok Lets get Started:
Resize elements to your liking
This is a very quick and easy tutorial
Open blank canvas 700x700
Open element 5 and place in center
Open element 5a and place on top - resize
With magic wand click inside top frame
Selections modify expand by 10
Open new layer under cluster
Open paper 1 and paste into selections
Select none
Place your tube
Now time to add our elements
I used the following:
Element 15
Element 18
Element 21
Element 23
Element 24
Element 26
Merge layers
Place your name where you like it
Add the Copyright and your License Number for the tube
Resize to your liking and save as PNG
This tutorial was created on May 1,2016 by Rhonda
Any resemblance to another Tag or Tutorial is purely coincidental

This tutorial is written for those with knowledge of PSP
Supplies Needed:
Tube of choice: I'm using the wonderful art work of Keith Garvey
You can purchase his work at his store HERE
FTU Scrap Kit by Faithway Designs HERE
Template #808 by Millie HERE
Don't forget to leave a thank you when downloading
Ok Lets get Started:
Open template - Shift D to duplicate then close out original
Deleted copyright
Click on layers 1&2 selections,select all, float,defloat
paste a paper of choice from the kit - I used paper2
selection invert delete
select none delete the original
Click on layers 3&4 selections,select all, float,defloat
paste a paper of choice from the kit - I used paper5
selection invert delete
select none delete the original
Click on layers 5&6 selections,select all, float,defloat
paste a paper of choice from the kit - I used paper13
selection invert delete
select none delete the original
Click on layer 7 selections,select all, float,defloat
paste a paper of choice from the kit - I used solid paper7
selection invert delete
select none delete the original
Click on layer 8 selections,select all, float,defloat
paste a paper of choice from the kit - I used solid paper9
selection invert delete
select none delete the original
Click on layer 9 selections,select all, float,defloat
paste a paper of choice from the kit - I used paper14
selection invert delete
select none delete the original
Place your tube
Xero Porcelin with settings of choice
Now time to add our elements
I used the following:
Button 2&3
Flower 1
Glitter 1&2
Leaves
Word Strip 1
Merge your layers
Place your name where you like it
Add the Copyright and your License Number for the tube
Resize to your liking and save as PNG
This tutorial was created on May 1,2016 by Rhonda
Any resemblance to another Tag or Tutorial is purely coincidental
Subscribe to:
Posts
(Atom)
Grab My Blinkie

I CT For


Blogs I Visit


