Sunday, March 29, 2015
This tutorial is written for those with knowledge of PSP
Supplies Needed:
Tube of choice: I'm using the wonderful art work of Maryline Cazenave
You can purchase these tubes at CDO HERE
PTU kit by Jen from Sweet Temptations called "Easter Is Here"
You can purchase this kit at one of her stores HERE
Mask of choice
This is a very simple and easy tut
Just place your elements where you want them
Ok Lets get started:
Open blank canvas 700x700
Open frame 2, resize 110% & place as a new layer
Open frame 3, resize 105% & place on top of other frame
Click inside frame with magic wand
Selection modify expand by 20
Open paper 9 & place as a new layer
Selections invert delete
Move paper under frame
Place your main tube
Add elements around the tube
I used the following:
Bling
Cake
Chic in Egg
Chic Owl
Chics in Egg
Cupcake Basket
Fence
Flower 1,2&3
Flowers
Pail
Ribbon
Merge your layers
Open paper of choice and apply mask
Place your name where you like it
Add the Copyright and your License Number for the tube
Resize to your liking and save as PNG
This tutorial was created on March 29,2015 by Rhonda
Any resemblance to another Tag or Tutorial is purely coincidental


Supplies Needed:
Tube of choice: Im using the wonderful art work of Ishika Chowdhury
You must obtain a license to use this art at S&Co HERE
PTU Scrap Kit from Designs by Joan called "Suzie"
You can purchase this awesome kit at S&Co HERE
Mask of choice
Ok Lets get Started:
This is a very quick and easy tutorial
Open new canvas 700x700
Open element 10 & place in center of tag
Grab the magic wand & click inside frame
Selections modify expand by 20
Add new layer under frame
Selections select all
Open paper 8 & paste into selections
Place your main tube
Now time to add our elements
I used the following:
Element 31
Element 39
Element 40
Element 46
Element 72
Element 84
Element 88
Merge your layers
Open paper of choice & apply mask
Place your name where you like it
Add the Copyright and your License Number for the tube
Resize to your liking and save as PNG
This tutorial was created on March 29,2015 by Rhonda
Any resemblance to another Tag or Tutorial is purely coincidental
This tutorial is written for those with knowledge of PSP
Supplies Needed:
Tube of choice: Im using the wonderful art work of VeryMany
You can purchase these tubes HERE
FTU scrapkit by Crystals Creations HERE
Mask of choice
Ok.. Lets get started:
Open blank canvas 700x700
Open frame & resize 80%
Using selection tool draw rectangle around inside frames
Open paper 8 and paste as new layer
Selections invert delete
Move paper under frame
Open butterfly scatter - resize 30% and place to left of frame
Duplicate and mirror
Add tube to center of frame
I always build around my tube
Starting on left side of frame
Open bunny flowers - resize 40% and place in front of tube (make it work for your tube)
Open daffodil - resize 40% and place behind rabbit
Open tulips - resize 40% and place beside daffodil
Open basket - resize 40% and place to right beside tube
Open cupcake - resize 32% and place behind basket more to end of frame
Open butterfly - resize 34% and place to top left corner
Open bird - resize 34% and place to top right corner
Open sparkles 2 - resize 80% and place to top of tag
Duplicate and move layer down a litle toward the bottom
Merge layers together
Open paper 2 and apply mask of choice
Place your name where you like it
Add the Copyright and your License Number for the tube
Resize to your liking and save as PNG
This tutorial was created on March 21,2015 by Rhonda
Any resemblance to another Tag or Tutorial is purely coincidental
Saturday, March 28, 2015
This tutorial is written for those with knowledge of PSP
Supplies Needed:
Tube of choice: I'm using the wonderful art work of Misticheskaya
You must obtain a license to use at PFD HERE
PTU Scrap Kit from Icy Blue Mystic Designs called My Spring Garden
You can purchase this kit at one of her stores HERE
Mask of choice
Ok Lets get Started:
Resize elements to your liking
This is a very quick and easy tutorial
Open blank canvas 700x700
Open frame 6
Click inside frame with magic wand
Selections modify expand by 8
Open paper 3 and paste as new layer
Selections invert delete
Move paper under frame
Place your main tube & build around it
Now time to add our elements
I used the following:
Bird 2&4
Butterfly 1,2&3
Chick
Cloud
Daisy Swirl 2&4
EggsNTulips 1&2
Spring Sign
Tree Branch
TulipCup 1&2
Merge layers
Open paper of choice and apply mask
Place your name where you like it
Add the Copyright and your License Number for the tube
Resize to your liking and save as PNG
This tutorial was created on March 28,2015 by Rhonda
Any resemblance to another Tag or Tutorial is purely coincidental

This tutorial is written for those with knowledge of PSP
Supplies Needed:
Tube of choice: Im using the wonderful art work of Selisan Al_Gaib
You must obtain a license to use this art at ICZ Store HERE
PTU Scrapkit by Scrappin With Lil Ole Me called "Karrot Patch"
You can purchase this kit at ICZ Store HERE
Template #4 by Rocked by Rachel HERE
Mask of choice
Ok Lets get Started:
Open template - Shift D to duplicate then close out original
Resize all layers 85%
Increase canvas 700x700
Delete copyright
Click on layer 1 selections,select all, float,defloat
paste a paper of choice from the kit - I used paper13
selection invert delete
select none delete the original
Click on layer 2 selections,select all, float,defloat
paste a paper of choice from the kit - I used paper16
selection invert delete
select none delete the original
Click on layer 3 selections,select all, float,defloat
paste a paper of choice from the kit - I used paper12
selection invert delete
select none delete the original
Click on layer 4 selections,select all, float,defloat
paste a paper of choice from the kit - I used paper11
selection invert delete
select none delete the original
Click on layer 5 selections,select all, float,defloat
paste a paper of choice from the kit - I used paper10
selection invert delete
select none delete the original
Click on layer 6 selections,select all, float,defloat
paste a paper of choice from the kit - I used paper8
selection invert delete
select none delete the original
Add noise to layer 7
Place your main tube
Now time to add our elements
I used the following:
Elements 3
Elements 16
Elements 20
Elements 24
Elements 25
Elements 26
Elements 40
Elements 48
Elements 49
Elements 54
Elements 64
Elements 65
Elements 66
Elements 70
Elements 74
Elements 76
Elements 95
Elements 96
Elements 99
Elements 101
Elements 103
Elements 110
Elements 111
Elements 117
Elements 118
Elements 127
Elemebts 140
Merge your layers
Open paper of choice and apply mask
Place your name where you like it
Add the Copyright and your License Number for the tube
Resize to your liking and save as PNG
This tutorial was created on March 28,2015 by Rhonda
Any resemblance to another Tag or Tutorial is purely coincidental
Friday, March 27, 2015
This tutorial is written for those with knowledge of PSP
Supplies Needed:
Tube of choice: Im using the wonderful art work of Ismael Rac
You can purchase his tubes HERE
PTU Scrap Kit by Purple Dream Scraps called Easter Bunny
You can purchase this awesome kit from one of her stores HERE
Mask of choice
Ok Lets get Started:
Open a blank image 700x700
Open element 28 and place as a new image
Grab the magik wand and click inside frame
Select modify expand by 10
Open paper 2 and place as a new layer
selections invert - delete
Place your main tube
Xero Radiance with settings of choice
Now add any elements of choice
I used the following:
Element 3
Element 4
Element 9
Element 11
Element 14
Element 17
Element 18
Element 19
Element 20
Element 25
Element 26
Element 31
Element 33
Element 36
Element 43
Merge layers
Open paper 11 and apply mask of choice
Place your name where you like it
Add the Copyright and your License Number for the tube
Resize to your liking and save as PNG
This tutorial was created on March 27,2015 by Rhonda
Any resemblance to another Tag or Tutorial is purely coincidental
Thursday, March 26, 2015

This tutorial is written for those with knowledge of PSP
Supplies Needed:
Tube of choice: Im using the wonderful art work of Andy Cooper
You must obtain a license to use his art at S&Co HERE
Matching PTU Scrapkit by DNScraps called Martini Surf
You can purchase this kit from S&CO HERE
Mask of choice
Resize elements to your liking
Ok Lets get Started:
This is a very quick and easy tutorial
Open blank canvas 700x700
Open glass element and place in center
Place main tube to right of tag
Add any other elements you want from the kit
I used the following:
Boat 2
Bottle
Bubbles
Camera
Castle
Castle 2
Fishing Net
Palm 2
Parrot
Plants
Raindrops
Starfish
Tomon
Tower
Water
Merge layers
Open paper 1 & apply mask of choice
Place your name where you like it
Add the Copyright and your License Number for the tube
Resize to your liking and save as PNG
This tutorial was created on March 26,2015 by Rhonda
Any resemblance to another Tag or Tutorial is purely coincidental

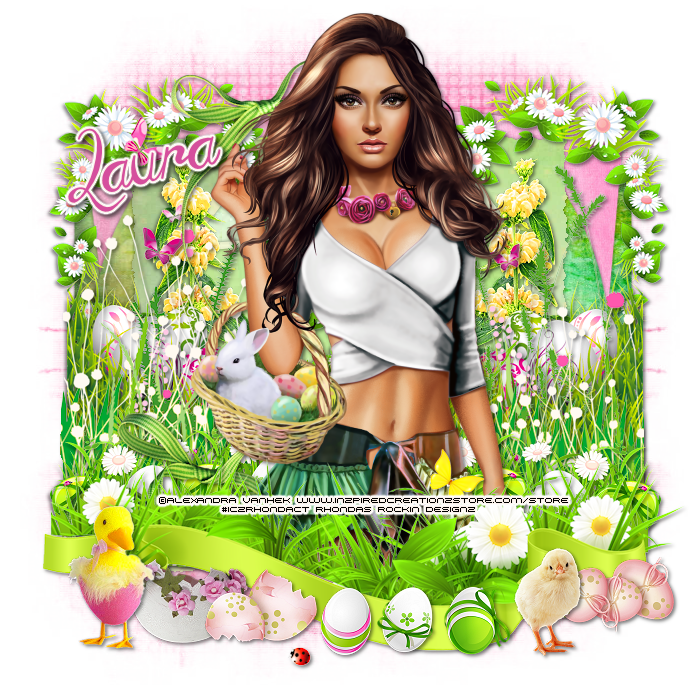
This tutorial is written for those with knowledge of PSP
Supplies Needed:
Tube of choice: I'm using the wonderful art work of Alexandra Vanhek
You must obtain a license to use this art at ICZ Store HERE
PTU Scrapkit by Amy Marie called "The Carrot Patch"
You can purchase this kit at ICZ Store HERE
Template #154 by Scrappy Bit of Fun HERE
Mask of choice
Ok Lets get Started:
Open template - Shift D to duplicate then close out original
Resize all layers 90%
Canvas size 700x700
Delete copyright, word art and hearts
Click on raster 7 selections,select all, float,defloat
paste a paper of choice from the kit - I used paper20
selection invert delete
select none delete the original
add border with noise
Click on raster 8 selections,select all, float,defloat
paste a paper of choice from the kit - I used paper21
selection invert delete
select none delete the original
add border with noise
Click on raster 3 selections,select all, float,defloat
paste a paper of choice from the kit - I used paper4
selection invert delete
select none delete the original
add border with noise
Click on copy of raster 3 selections,select all, float,defloat
paste a paper of choice from the kit - I used paper9
selection invert delete
select none delete the original
add border with noise
Click on raster 4 selections,select all, float,defloat
paste a paper of choice from the kit - I used paper7
selection invert delete
select none delete the original
add border with noise
Place your main tube
Now add any other elements of choice
I used the following:
Element 2
Element 4
Element 8
Element 12
Element 18
Element 19
Element 20
Element 21
Element 28
Element 29
Element 32
Element 39
Element 63
Element 67
Element 68
Element 69
Element 71
Element 74
Element 75
Element 77
Element 78
Element 79
Element 81
Element 82
Merge your layers
Add paper of choice & apply mask
Place your name where you like it
Add the Copyright and your License Number for the tube
Resize to your liking and save as PNG
This tutorial was created on March 26,2015 by Rhonda
Any resemblance to another Tag or Tutorial is purely coincidental
Wednesday, March 25, 2015
This tutorial is written for those with knowledge of PSP
Supplies Needed:
Tube of choice: Im using the wonderful art work of Keith Garvey
This tube was purchase at PTE which has closed
You can purchase his work at his store HERE
FTU Scrap Kit by Addictive Pleasures HERE
Template #408 by Missy HERE
Easter Mask by Rocked by Rachel HERE
Don't forget to leave a thank you when downloading
Ok... Lets get Started:
Open template - Shift D to duplicate then close out original
Resize template 90% all layers
Canvas size 700x700
Deleted copyright
Click on raster 8 selections,select all, float,defloat
paste a paper of choice from the kit - I used paper3
selection invert delete
select none delete the original
Click on raster 9 selections,select all, float,defloat
paste a paper of choice from the kit - I used paper1
selection invert delete
select none delete the original
Click on raster 7 selections,select all, float,defloat
paste a paper of choice from the kit - I used paper9
selection invert delete
select none delete the original
Click on copy of raster 7 selections,select all, float,defloat
paste a paper of choice from the kit - I used paper4
selection invert delete
select none delete the original
Click on raster 3 & copy of 3 selections,select all, float,defloat
paste a paper of choice from the kit - I used paper5
selection invert delete
select none delete the original
Click on raster 2 selections,select all, float,defloat
paste a paper of choice from the kit - I used paper10
selection invert delete
select none delete the original
Click on raster 5 selections,select all, float,defloat
paste a paper of choice from the kit - I used paper4
selection invert delete
select none delete the original
Click on copy of raster 5 selections,select all, float,defloat
paste a paper of choice from the kit - I used paper6
selection invert delete
select none delete the original
Click on copy 2 raster 5 selections,select all, float,defloat
paste a paper of choice from the kit - I used paper4
selection invert delete
select none delete the original
Add glitter to all frames
Place your main tube
Now time to add our elements
I used the following:
Bunny
Bunny 2&3
Button
Button 2&3
Candy
Egg
Eggs
Frame 4
Heart
Label
Ribbon
Sign
Sparkles
Star 2
Tag
Merge your layers
Open paper 7 and apply mask
Place your name where you like it
Add the Copyright and your License Number for the tube
Resize to your liking and save as PNG
This tutorial was created on March 25,2015 by Rhonda
Any resemblance to another Tag or Tutorial is purely coincidental

This tutorial is written for those with knowledge of PSP
Supplies Needed:
Tube of choice: I'm using the wonderful art work of Andy Cooper
You must obtain a license to use his art at S&Co HERE
Matching PTU Scrapkit by Designs by Joan HERE
Mask of choice
Ok.. Lets get Started:
This is a very quick and easy tutorial
Open blank canvas 700x700
Open element 43 and place in center
Grab the magic wand & click inside frame
Selections modify expand by 10
Add new layer under frame
Open paper 3 & paste into selections
Place main tube to right of tag
Add any other elements you want from the kit
I used:
Element 3
Element 7
Element 14
Element 15
Element 18
Element 22
Element 26
Element 34
Element 40
Element 42
Element 45
Element 46
Element 48
Element 52
Element 54
Element 55
Element 59
Element 63
Element 66
Element 67
Element 70
Element 78
Element 80
Element 89
Element 92
Merge layers
Open paper 7 & apply mask of choice
Place your name where you like it
Add the Copyright and your License Number for the tube
Resize to your liking and save as PNG
This tutorial was created on March 24,2015 by Rhonda
Any resemblance to another Tag or Tutorial is purely coincidental
Saturday, March 21, 2015
This tutorial is written for those with knowledge of PSP
Supplies Needed:
Tube of choice: I'm using the wonderful art work of Sweet Doll Artist
You must obtain a license to use this art at S&Co HERE
PTU Scrap Kit from Tammys Welt called "Hello Spring"
Kit can be purchased at S&CO HERE
Ok,, Lets get started:
Resize elements to your liking
This is a very quick and easy tutorial
Open blank canvas 700x700
Open element 46 & place in center of tag
Grab the magic wand & click inside frame
Selections modify expand by 10
Add new layer under frame
Open paper 1 and paste into selection
Select none
Now time to add our elements
I used the following:
Element 1
Element 4
Element 22
Element 34
Element 38
Element 52
Element 56
Element 57
Element 58
Element 59
Element 86
Element 88
Merge layers
Open paper of choice and apply mask
Place your name where you like it
Add the Copyright and your License Number for the tube
Resize to your liking and save as PNG
This tutorial was created on March 21,2015 by Rhonda
Any resemblance to another Tag or Tutorial is purely coincidental
Friday, March 20, 2015
This tutorial is written for those with knowledge of PSP
Supplies Needed:
Tube of choice: I'm using the wonderful art work of Selisan Al_Gaib
You can purchase this tube at ICZ Store HERE
PTU Scrap Kit by Nicky from Inzpired Creationz called "Sweet Love"
You an purchase this awesome kit from her store HERE
Template #133 by Addictive Templates HERE
Word art by Blame Beaches Tutorials HERE
Mask of choice
Don't forget to leave a thank you when downloading
Ok Lets get Started:
Open template - Shift D to duplicate then close out original
Resize template all layers 86%
Canvas size 700x700
Delete copyright, word art and layer 9
Click on layer 7 selections,select all, float,defloat
paste a paper of choice from the kit - I used paper20
selection invert delete
select none delete the original
add border with noise
Click on layer 6 selections,select all, float,defloat
paste a paper of choice from the kit - I used paper17
selection invert delete
select none delete the original
add border with noise
Click on layer 2 selections,select all, float,defloat
paste a paper of choice from the kit - I used paper19
selection invert delete
select none delete the original
add border with noise
Click on layer 4 selections,select all, float,defloat
paste a paper of choice from the kit - I used paper16
selection invert delete
select none delete the original
add border with noise
Click on layer 8 selections,select all, float,defloat
paste a paper of choice from the kit - I used paper19
selection invert delete
select none delete the original
add border with noise
Click on layer 1 selections,select all, float,defloat
paste a paper of choice from the kit - I used paper6
selection invert delete
select none delete the original
add border with noise
Click on layer 15 selections,select all, float,defloat
paste a paper of choice from the kit - I used paper2
selection invert delete
select none delete the original
Add noise to circle
Place your main tube
Now add any other elements of choice
I used the following:
Balloons 1
Bow 3
Bunny 1
Butterfly 1
Candies 3
Candy Heart 1&2
Candy 2
Cookies 1&2
Cupcake 1,2&3
Hearts 1&2
Ice Cream 1
Letter 1
Lollis 1
Sparkles 3
Strawberry 1
Merge your layers
Open paper of choice and apply mask
Place your name where you like it
Add the Copyright and your License Number for the tube
Resize to your liking and save as PNG
This tutorial was created on March 20,2015 by Rhonda
Any resemblance to another Tag or Tutorial is purely coincidental
Tuesday, March 17, 2015
This tutorial is written for those with knowledge of PSP
Supplies Needed:
Tube of choice: I'm using the wonderful art work of Pandora Creations
Which you must obtain a license to use at S&Co HERE
PTU Scrap Kit by Rebellious Scraps called Irish Land
You an purchase this awesome kit at S&CO HERE
Mask #3 by Dee HERE
Don't forget to leave a thank you when downloading
This is a very simple & easy tutorial
Just place your elements where you want them
Open blank 700x700 canvas
Open frame 4 and place in center
Click inside frame with wand
Selections Modify by 20
Add new layer under frame
Open paper 3 and paste into selections
Now time to add our elements
I used the following:
Bear on Horseshoe
Bubbles 1
Butterflies 1
Clovers
Cupcake 1&3
Elf with Balloon
Grass 1
Harp
Hat 1
Leprechaun
Mushroom House
Pot of Gold with Legs
Rainbow 1
Shamrock Bow
Snail
Tree 1
Merge your layers
Open paper 5 and apply mask
Place your name where you like it
Add the Copyright and your License Number for the tube
Resize to your liking and save as PNG
This tutorial was created on March 17,2015 by Rhonda
Any resemblance to another Tag or Tutorial is purely coincidental
Monday, March 16, 2015

This tutorial is written for those with knowledge of PSP
Supplies Needed:
Tube of choice: Im using the wonderful art work of VeryMany
You must obtain a license to use their art HERE
FTU Scrap Kit by Creative Scraps HERE
Template #47 by Millie HERE
Downloads are on left hand side of blog
Mask of choice
Don't forget to leave a thank you when downloading
Ok Lets get Started:
Open template - Shift D to duplicate then close out original
Canvas size 700x700
Deleted copyright, wordart & layer 9
Click on raster 1 selections,select all, float,defloat
paste a paper of choice from the kit - I used paper3
selection invert delete
select none delete the original
Click on raster 2 selections,select all, float,defloat
add new layer and flood fill with gradient of choice
add close-up of tube
selection invert delete
select none delete the original
change blend mode to hard light
add border with noise
Click on raster 3 selections,select all, float,defloat
paste a paper of choice from the kit - I used paper2
selection invert delete
select none delete the original
Click on raster 4 selections,select all, float,defloat
paste a paper of choice from the kit - I used paper6
selection invert delete
select none delete the original
Click on raster 5 selections,select all, float,defloat
paste a paper of choice from the kit - I used paper1
selection invert delete
select none delete the original
Click on raster 6 selections,select all, float,defloat
paste a paper of choice from the kit - I used paper4
selection invert delete
select none delete the original
add border with noise
Click on raster 7 selections,select all, float,defloat
paste a paper of choice from the kit - I used paper5
selection invert delete
select none delete the original
Click on raster 8 selections,select all, float,defloat
add new layer and flood fill with gradient of choice
add close-up of tube
selection invert delete
select none delete the original
change blend mode to hard light
add border with noise
Place your main tube in center
Xero Radiance with settings of choice
Now time to add our elements
I used the following:
Element 3
Element 9
Element 16
Element 17
Element 20
Element 23
Element 24
Element 25
Element 26
Merge your layers
Open paper of choice & apply mask
Place your name where you like it
Add the Copyright and your License Number for the tube
Resize to your liking and save as PNG
This tutorial was created on March 16,2015 by Rhonda
Any resemblance to another Tag or Tutorial is purely coincidental
Sunday, March 15, 2015

This tutorial is written for those with knowledge of PSP
Supplies Needed:
Tube of choice: I'm using the wonderful art work of Tony Tzanoukakis
You can find this artist work at his store HERE
PTU Scrap Kit by Jen from Sweet Temptations called "Clover"
You can purchase this kit from one of her stores HERE
Template by Rachel HERE
Mask #1 by Rosie HERE
Don't forget to leave a thank you when downloading
Ok Lets get Started:
Open template - Shift D to duplicate then close out original
Resize template all layers
Canvas size 700x700
Delete copyright
Click on circle selections,select all, float,defloat
paste a paper of choice from the kit - I used paper6
selection invert delete
select none delete the original
add border with noise
Click on rec 1 selections,select all, float,defloat
paste a paper of choice from the kit - I used paper10
selection invert delete
select none delete the original
add border with noise
Click on rect 2 selections,select all, float,defloat
paste a paper of choice from the kit - I used paper4
selection invert delete
select none delete the original
add border with noise
Click on small rectangles selections,select all, float,defloat
paste a solid color or gradient
selection invert delete
select none delete the original
apply blinds effect
Click on dotted circle selections,select all, float,defloat
paste a solid color
selection invert delete
select none delete the original
Place your main tube
Xero Radiance with settings of choice
Now time to add our elements
I used the following:
Bear
Cake
Calendar
Hat n Coins
Leprachaun
Pot of Gold 1
Ribbon 2
Spray
Swirl
Whiskey Barrel
Wreath
Merge your layers
Open paper 8 & apply mask
Place your name where you like it
Add the Copyright and your License Number for the tube
Resize to your liking and save as PNG
This tutorial was created on March 15,2015 by Rhonda
Any resemblance to another Tag or Tutorial is purely coincidental

This tutorial is written for those with knowledge of PSP
Supplies Needed:
Tube of choice: I'm using the wonderful art work of Vi Nina
You must obtain a license to use this art at S&Co HERE
PTU Scrap Kit from Disturbed Scraps called "Fall for Sylvia"
You can purchase this awesome kit at S&Co HERE
Mask #5 by Beth Ann HERE
Ok Lets get Started:
This is a very quick and easy tutorial
Open blank canvas 700x700
Open element 75 and place in center
Grab the magic wand & click inside frame
Selections modify expand by 10
Open paper 5 & paste as new layer
Selections invert delete
Move paper under frame
Place main tube to center of tag
Add any other elements you want from the kit
I used:
Element 4
Element 7
Element 8
Element 10
Element 11
Element 14
Element 15
Element 17
Element 22
Element 23
Element 24
Element 28
Element 30
Element 41
Element 55
Element 59
Element 67
Element 85
Merge layers
Open paper 12 & apply mask
Place your name where you like it
Add the Copyright and your License Number for the tube
Resize to your liking and save as PNG
This tutorial was created on March 15,2015 by Rhonda
Any resemblance to another Tag or Tutorial is purely coincidental
Saturday, March 14, 2015
This tutorial is written for those with knowledge of PSP
Supplies Needed:
Tube of choice: Im using the wonderful art work of Alexandra Vanhek
You must obtain a license to use this art at ICZ Store HERE
PTU Scrapkit by Tina Turtle Designs called "Spring Bunnies"
You can purchase this kit at ICZ Store HERE
Template #264 by BeckyP's Creations HERE
Mask of choice
Ok Lets get Started:
Open template - Shift D to duplicate then close out original
Increase canvas 700x700
Delete copyright,trim lines & center frame trim
Click on big rectangle selections,select all, float,defloat
paste a paper of choice from the kit - I used paper4
selection invert delete
select none delete the original
Click on left & right rectangles selections,select all, float,defloat
paste a paper of choice from the kit - I used paper28
selection invert delete
select none delete the original
Click on raster 12 selections,select all, float,defloat
paste a paper of choice from the kit - I used paper25
selection invert delete
select none delete the original
Click on center square selections,select all, float,defloat
paste a paper of choice from the kit - I used paper6
selection invert delete
select none delete the original
Click on frame fill selections,select all, float,defloat
paste a paper of choice from the kit - I used paper8
selection invert delete
select none delete the original
Click on center frame selections,select all, float,defloat
paste a paper of choice from the kit - I used paper5
selection invert delete
select none delete the original
Click on left & right frame fill selections,select all, float,defloat
paste a paper of choice from the kit - I used paper26
selection invert delete
select none delete the original
Click on left & right frame selections,select all, float,defloat
paste a paper of choice from the kit - I used paper9
selection invert delete
select none delete the original
Place your main tube
Now time to add our elements
I used the following:
Elements 7
Elements 8
Elements 9
Elements 64
Elements 65
Elements 68
Elements 82
Elements 84
Elements 86
Elements 95
Elements 113
Elements 119
Elements 120
Merge your layers
Open paper of choice and apply mask
Place your name where you like it
Add the Copyright and your License Number for the tube
Resize to your liking and save as PNG
This tutorial was created on March 14,2015 by Rhonda
Any resemblance to another Tag or Tutorial is purely coincidental
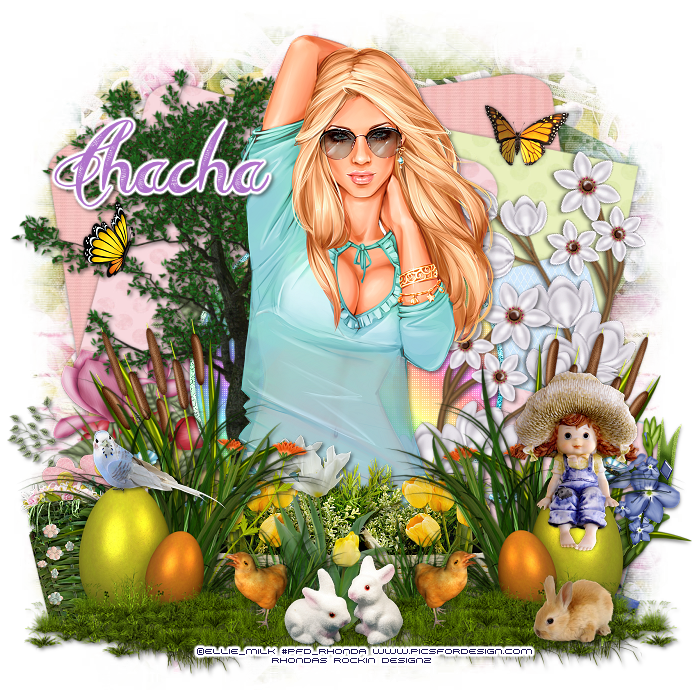
This tutorial is written for those with knowledge of PSP
Supplies Needed:
Tube of choice: I'm using the wonderful art work of Ellie_Milk
Which you must obtain a license to use at PFD HERE
PTU Scrap Kit by Chachaz Creations called Sweet Spring
You an purchase this awesome kit at one of her stores HERE
Template #148 by Tamie HERE
Mask of choice
Ok Lets get Started:
Open template - Shift D to duplicate then close out original
Resize template 82% all layers
Canvas size 700x700
delete copyright &layer 7
Click on layer 10 selections,select all, float,defloat
paste a paper of choice from the kit - I used paper2
selection invert delete
select none delete the original
Click on layer 6 selections,select all, float,defloat
paste a paper of choice from the kit - I used paper4
selection invert delete
select none delete the original
Click on layer 3 selections,select all, float,defloat
paste a paper of choice from the kit - I used paper3
selection invert delete
select none delete the original
Click on layer 4 selections,select all, float,defloat
paste a paper of choice from the kit - I used paper1
selection invert delete
select none delete the original
Click on layer 2 selections,select all, float,defloat
paste a paper of choice from the kit - I used paper5
selection invert delete
select none delete the original
Click on layers 1 selections,select all, float,defloat
add new layer and fllod fill with solid or gradient
select none delete the original
Click on layer 5 selections,select all, float,defloat
paste a paper of choice from the kit - I used paper3
selection invert delete
select none delete the original
add noise
Place your main tube
Now time to add our elements
I used the following:
Element 2
Element 3
Element 6
Element 7
Element 9
Element 11
Element 12
Element 14
Element 17
Element 23
Element 27
Element 28
Element 34
Element 38
Element 39
Element 43
Merge your layers
Open element 50
Duplicate until you have made a paper
Apply mask of choice
Place your name where you like it
Add the Copyright and your License Number for the tube
Resize to your liking and save as PNG
This tutorial was created on March 14,2015 by Rhonda
Any resemblance to another Tag or Tutorial is purely coincidental
Friday, March 13, 2015

This tutorial is written for those with knowledge of PSP
Supplies Needed:
Tube of choice: I'm using the wonderful art work of VeryMany
You must obtain a license to use HERE
PTU Scrap Kit from Icy Blue Mystic Designs called Cutie Skullz
You can purchase this kit at one of her stores HERE
Mask of choice
Ok Lets get Started:
Resize elements to your liking
This is a very quick and easy tutorial
Open blank canvas 700x700
Open frame 3
Click inside with magic wand
Add new layer under frame and select all
Open paper 7 and paste into selections
Place your main tube & build around it
Now time to add our elements
I used the following:
Bow 4
Bubbles Wand and Bottle
Emo Heart
Emo Skulls Pocket
EyeNBone String
Heart Headphones
Heartspray 2
Ipod
Music Scatter
Poison Spray 2
Skull Lily 2
Merge layers
Open paper 10 and apply mask of choice
Place your name where you like it
Add the Copyright and your License Number for the tube
Resize to your liking and save as PNG
This tutorial was created on March 13,2015 by Rhonda
Any resemblance to another Tag or Tutorial is purely coincidental
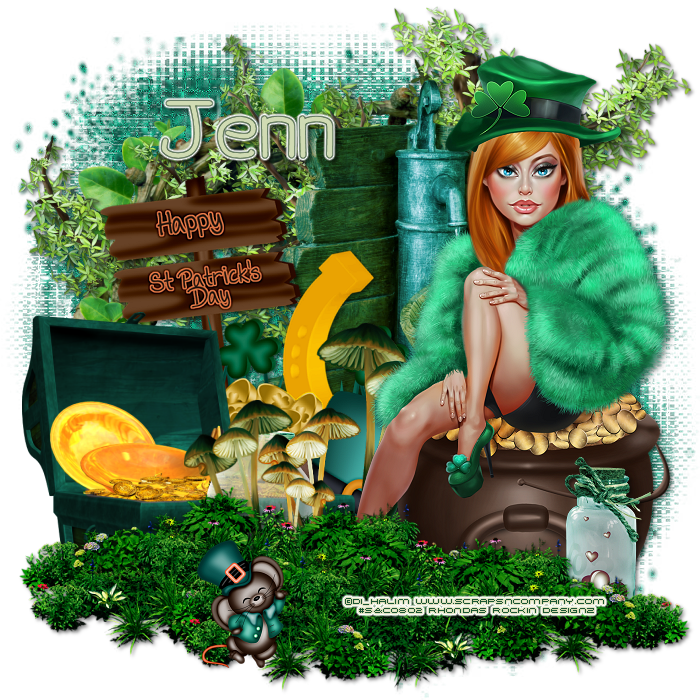
This tutorial is written for those with knowledge of PSP
Supplies Needed:
Tube of choice: Im using the wonderful art work of Di-Halim
You must obtain a license to use this art at S&Co HERE
PTU Scrap Kit from Ginnibug Designz called "Irish Beauty"
You an purchase this awesome kit at S&Co HERE
Mask of choice
Ok Lets get Started:
Open blank canvas size 700x700
Open element 53 and place in center
Place your main tube
Now time to add our elements
I used the following:
Element 6
Element 43
Element 46
Element 49
Element 60
Element 70
Element 84
Element 90
Element 94
Merge your layers
Open paper of choice & apply mask of choice
Place your name where you like it
Add the Copyright and your License Number for the tube
Resize to your liking and save as PNG
This tutorial was created on March 13,2015 by Rhonda
Any resemblance to another Tag or Tutorial is purely coincidental
Tuesday, March 10, 2015
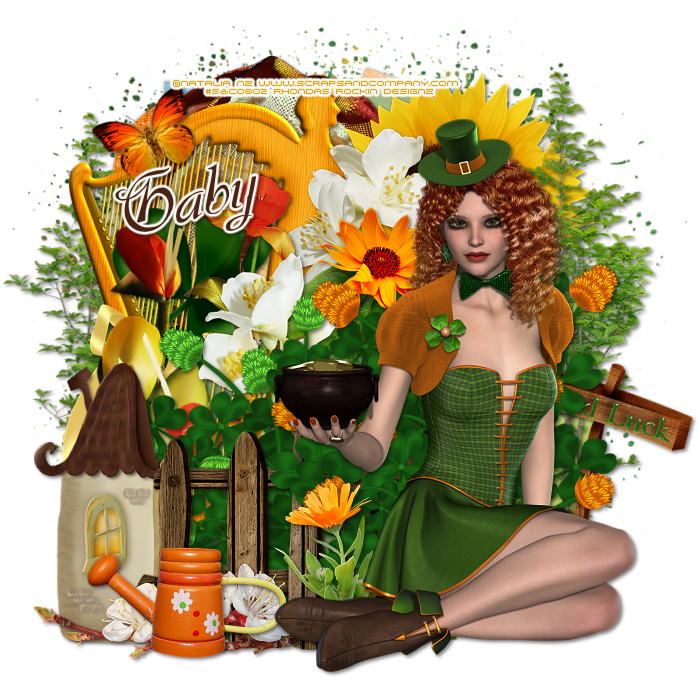
This tutorial is written for those with knowledge of PSP
Supplies Needed:
Tube of choice: I'm using the wonderful art work of Natalia Nz
You must obtain a license to use this art at S&Co HERE
PTU Scrap Kit from Disturbed Scraps called "I Am Lucky To Have You"
You an purchase this awesome kit at S&Co HERE
Template #100 by Bookworm Dezines HERE
Links are to the left
Mask of choice
Ok Lets get Started:
Open template - Shift D to duplicate then close out original
Increase canvas size to 700x700
delete copyright
Click on layer 3 selections,select all, float,defloat
paste a paper of choice from the kit - I used paper6
selection invert delete
select none delete the original
Click on layer 5 selections,select all, float,defloat
paste a paper of choice from the kit - I used paper1
selection invert delete
select none delete the original
Click on layer 6 selections,select all, float,defloat
paste a paper of choice from the kit - I used paper12
selection invert delete
select none delete the original
Click on copy of layer 6 selections,select all, float,defloat
paste a paper of choice from the kit - I used paper11
selection invert delete
select none delete the original
Click on layer 4 & copy of layer selections,select all, float,defloat
paste a paper of choice from the kit - I used paper12
selection invert delete
select none delete the original
Click on layer 2 selections,select all, float,defloat
paste a paper of choice from the kit - I used paper13
selection invert delete
select none delete the original
Place your main tube
Now time to add our elements
I used the following:
Element 1
Element 2
Element 3
Element 7
Element 8
Element 11
Element 12
Element 15
Element 21
Element 23
Element 28
Element 31
Element 33
Element 41
Element 56
Element 58
Element 60
Element 75
Merge your layers
Open paper of choice & apply mask of choice
Place your name where you like it
Add the Copyright and your License Number for the tube
Resize to your liking and save as PNG
This tutorial was created on March 10,2015 by Rhonda
Any resemblance to another Tag or Tutorial is purely coincidental
Monday, March 9, 2015
This tutorial is written for those with knowledge of PSP
Supplies Needed:
Tube of choice: I'
You must obtain a license to use this art HERE
PTU Scrapkit by Nicky from Inzpired Creationz called "Ladybug_Glen"
You can purchase this kit at her store HERE
Mask of choice
Ok Lets get Started:
This is a very quick and easy tutorial
Add any elements you want from the kit
I used:
Basket 1
Butterfly 1&2
Cluster 1&2
Coins 2
Doodle 3
Flowers 2,3&4
Grass 1&3
Horseshoes 1
Ladybug 2
Mushroom House 172
Mushroom 3
Mushrooms 1
Rainbow 1
Sparkles 1
Tree 2
Waterfall 1
Merge layers
Open paper of choice and apply mask
Place your name where you like it
Add the Copyright and your License Number for the tube
Resize to your liking and save as PNG
This tutorial was created on March 9,2015 by Rhonda
Any resemblance to another Tag or Tutorial is purely coincidental
This tutorial is written for those with knowledge of PSP
Supplies Needed:
Tube of choice: I'm using the wonderful art work of Lightartsis_XXX
You must obtain a license to use at PFD HERE
FTU Cluster from Chilipepper Spiced HERE
Mask #21 by Gems HERE
Download Supplies HERE
Ok Lets get Started:
Open cluster frame
Shift D to duplicate and close original
Resize cluster 90%
I add a blank white layer under my frame
With selection tool draw a square around frame
Add new layer under frame and flood fill with solid color or gradient
While still selected add close up of tube to left hand side of frame
Select none
Apply Xero Radiance to tube (or filter of choice)
Apply PhotoEffex to tube (You can use blinds effect)
Apply tube again to right hand side of frame
I placed mine to look like she was coming out of frame
Apply Xero Radiance again or any filter of choice
Merge layers
Open paper provided and apply mask
Place your name where you like it
Add the Copyright and your License Number for the tube
Resize to your liking and save as PNG
This tutorial was created on Feburary 25,2015 by Rhonda
Any resemblance to another Tag or Tutorial is purely coincidental
This tutorial is written for those with knowledge of PSP
Supplies Needed:
Tube of choice: Im using the wonderful art work of Alex Prihodko
You can purchase his tubes at PFD HERE
PTU Scrap Kit by Purple Dream Scraps called Irish Clover
You can purchase this awesome kit at one of her stores HERE
Mask by Rocked by Rachel HERE
Ok Lets get Started:
Open a blank image 700x700
Open element 23 from kit and place as a new image
Grab the magik wand and click inside frame
Select modify expand by 5
Open paper 16 from kit and place as a new layer
Selections invert - delete
Move paper under frames and merge together
Duplicate frame and move one up a little
Look at mine for example
Place your main tube
Now add any elements of choice
I used the following:
Element 3
Element 5
Element 6
Element 9
Element 10
Element 20
Element 27
Element 29
Element 41
Element 44
Element 45
Element 47
Element 48
Merge your layers
Open paper of choice and apply mask
Place your name where you like it
Add the Copyright and your License Number for the tube
Resize to your liking and save as PNG
This tutorial was created on March 9,2015 by Rhonda
Any resemblance to another Tag or Tutorial is purely coincidental
Friday, March 6, 2015
This tutorial is written for those with knowledge of PSP
Supplies Needed:
Tube of choice: I'm using the wonderful art work of Misticheskaya
You must obtain a license to use at PFD HERE
PTU Scrap Kit from Icy Blue Mystic Designs called Lucky in Love
You can purchase this kit from one of her stores HERE
Clover mask by Jackie Jewels HERE
Ok Lets get Started:
Resize elements to your liking
This is a very quick and easy tutorial
Open blank canvas 700x700
Open Frame 4, resize and place in center
Click inside frame with magic wand
Expand by 8
Open paper 5 and paste as new layer
Selections invert
Move paper under frame
Place your main tube where desired
Now time to add our elements
I used the following:
Cupcake
Flower Branch 3
Irish Stamp 1&2
Love Box
Lucky Rainbow
Tea Cup 1
Vines 1&3
Merge layers
Open paper 1 and apply mask
Place your name where you like it
Add the Copyright and your License Number for the tube
Resize to your liking and save as PNG
This tutorial was created on March 7,2015 by Rhonda
Any resemblance to another Tag or Tutorial is purely coincidental

This tutorial is written for those with knowledge of PSP
Supplies Needed:
Tube of choice: I'm using the wonderful art work of Vi Nina
You must obtain a license to use this art at S&Co HERE
PTU Scrap Kit from Bibi called "Julie Love"
You can purchase this awesome kit at S&Co HERE
Template #733 by Millie HERE
Mask of choice
Ok Lets get Started:
Open template - Shift D to duplicate then close out original
Canvas size 700x700
delete copyright
Click on layer 1 selections,select all, float,defloat
paste a paper of choice from the kit - I used paper6
selection invert delete
select none delete the original
Click on layer 2 selections,select all, float,defloat
paste a paper of choice from the kit - I used paper8
selection invert delete
select none delete the original
Click on layers 3&4 selections,select all, float,defloat
paste a paper of choice from the kit - I used paper10
selection invert delete
select none delete the original
Click on layers 5&6 selections,select all, float,defloat
paste a paper of choice from the kit - I used paper9
selection invert delete
select none delete the original
Click on layers 7&8 selections,select all, float,defloat
paste a paper of choice from the kit - I used paper4
selection invert delete
select none delete the original
Click on layer 9 selections,select all, float,defloat
paste a paper of choice from the kit - I used paper1
selection invert delete
select none delete the original
Click on layer 10 selections,select all, float,defloat
paste a paper of choice from the kit - I used paper5
selection invert delete
select none delete the original
Place your main tube
Now time to add our elements
I used the following:
Element 2
Element 4
Element 8
Element 11
Element 22
Element 23
Element 24
Element 31
Element 42
Element 48
Element 49
Element 61
Element 70
Element 83
Element 84
Element 89
Element 93
Element 106
Element 109
Element 114
Merge your layers
Open paper of choice & apply mask
Place your name where you like it
Add the Copyright and your License Number for the tube
Resize to your liking and save as PNG
This tutorial was created on March 6,2015 by Rhonda
Any resemblance to another Tag or Tutorial is purely coincidental
Subscribe to:
Posts
(Atom)
Grab My Blinkie

I CT For


Blogs I Visit


