Tuesday, December 31, 2013

Supplies Needed:
Tube of choice: Im using the wonderful art work of Alex Prihdko
You must obtain a license to use his art at PFD HERE
PTU ScrapKit by CandyCata called "Happy New Year"
You an purchase this awesome kit at Pimp My Tags With Scraps HERE
New Years Template #2 by Brutal Designs HERE
Mask #156 by Vaybs HERE
Xero Radiance
Eyecandy Gradient Glow
Open template - Shift D to duplicate then close out original
Resize template 85% all layers
Canvas size 700x700
delete copyright,layers 6,8,copy of 8 and 11
paste a paper of choice from the kit - I used paper19
selection invert delete
select none delete the original
paste a paper of choice from the kit - I used paper1
selection invert delete
select none delete the original
paste a paper of choice from the kit - I used paper11
selection invert delete
select none delete the original
paste a paper of choice from the kit - I used paper14
selection invert delete
select none delete the original
paste a paper of choice from the kit - I used paper17
selection invert delete
select none delete the original
paste a paper of choice from the kit - I used paper12
selection invert delete
select none delete the original
paste a paper of choice from the kit - I used paper13
selection invert delete
select none delete the original
paste a paper of choice from the kit - I used paper15
selection invert delete
select none delete the original
paste a paper of choice from the kit - I used paper9
selection invert delete
select none delete the original
apply Eyecandy Gradient Glow
place where desired
Xero Radiance with settings of choice
I used the following:
Balloon 3 HNY
Cake
Champagne Bottle Black Open
Champagne Glass Green
Clock
Firework 6
Frame 11
New Years Decoration 1&2
Sparkles 2
Open paper 6 & apply mask
Add the Copyright and your License Number for the tube
Resize to your liking and save as PNG
This tutorial was created on December 31,2013 by Rhonda
Any resemblance to another Tag or Tutorial is purely coincidental

Thursday, December 26, 2013

Supplies Needed:
Tube of choice: Im using the wonderful art work of VeryMany
You must obtain a license to use there art HERE
PTU Scrap Kit by Laura from Tiny Turtle Design called "2014"
You an purchase this awesome kit at her store HERE
Xero Radiance
Open blank canvas 700x700
Open element 158 and place in center of canvas
Grab the magic wand and click inside frame
Selections modify expand by 5
Open Paper 14 & paste as new layer
Selections invert delete
Move paper under frame
Place tube in center of frame
Apply Xero Radiance with settings of choice
I used:
Element 3
Element 8
Element 10
Element 17
Element 18
Element 32
Element 33
Element 35
Element 57
Element 58
Element 59
Add the Copyright and your License Number for the tube
Resize to your liking and save as PNG
This tutorial was created on December 26,2013 by Rhonda
Any resemblance to another Tag or Tutorial is purely coincidental
Wednesday, December 25, 2013

Supplies Needed:
Tube of choice: Im using the wonderful art work of Scott Blair
This tube was purchased when he was at MPT which has closed
I'm not usre where he is selling his art but his homepage is HERE
FTU Scrap Kit by Jen from Sweet Temptations called "Wishing for a White Christmas"
You can download this awesome kit HERE
Template #2 by Flaminsal HERE
Don't forget to leave a thank you when downloading
Xero Radiance
Eyecandy Gradient Glow
Open template - Shift D to duplicate then close out original
delete copyright,left & right red circles & dotted circles
paste a paper of choice from the kit - I used paper9
selection invert delete
select none delete the original
paste a paper of choice from the kit - I used paper3
selection invert delete
select none delete the original
paste a paper of choice from the kit - I used paper10
selection invert delete
select none delete the original
paste a paper of choice from the kit - I used paper6
selection invert delete
select none delete the original
paste a paper of choice from the kit - I used paper2
selection invert delete
select none delete the original
add new layer & flood fill with white
apply noise with settings of choice
select none delete the original
apply Eyecandy Gradient Glow
Xero Radiance with settings of choice
I used the following:
Bag
Bag 3
Gift 1-4
Ornament 1&3
Ornaments 2
Snowman
Tree 2
Wreath
Add the Copyright and your License Number for the tube
Resize to your liking and save as PNG
This tutorial was created on December 25, 2013 by Rhonda
Any resemblance to another Tag or Tutorial is purely coincidental

Supplies Needed:
Tube of choice: Im using the wonderful art work of Zebrush
Which you must obtain a license to use at Pic for Design HERE
PTU Scrap Kit by Jen from Sweet Temptations called "Tonights the Night"
You an purchase this awesome kit HERE
Template by Janice from Jus Graphicx HERE
It's the bottom template
Don't forget to leave a thank you when downloading
Plugins Used:
Xero Radiance
Open template - Shift D to duplicate then close out original
Canvas size 725x700
delete copyright
paste a paper of choice from the kit - I used paper5
selection invert delete
select none delete the original
paste a paper of choice from the kit - I used paper6
selection invert delete
select none delete the original
paste a paper of choice from the kit - I used paper8
selection invert delete
select none delete the original
paste a paper of choice from the kit - I used paper1
selection invert delete
select none delete the original
paste a paper of choice from the kit - I used paper7
selection invert delete
select none delete the original
paste a paper of choice from the kit - I used paper4
selection invert delete
select none delete the original
paste a paper of choice from the kit - I used paper10
selection invert delete
select none delete the original
paste a paper of choice from the kit - I used paper9
selection invert delete
select none delete the original
Xero Radiance with settings of choice
I used the following:
Balloon 1&2
Bucket
Corsage
Cupcake 1&2
Decor1
Drink
Fireworks 1&2
Wand
Add the Copyright and your License Number for the tube
Resize to your liking and save as PNG
This tutorial was created on January 4, 2013 by Rhonda
Any resemblance to another Tag or Tutorial is purely coincidental
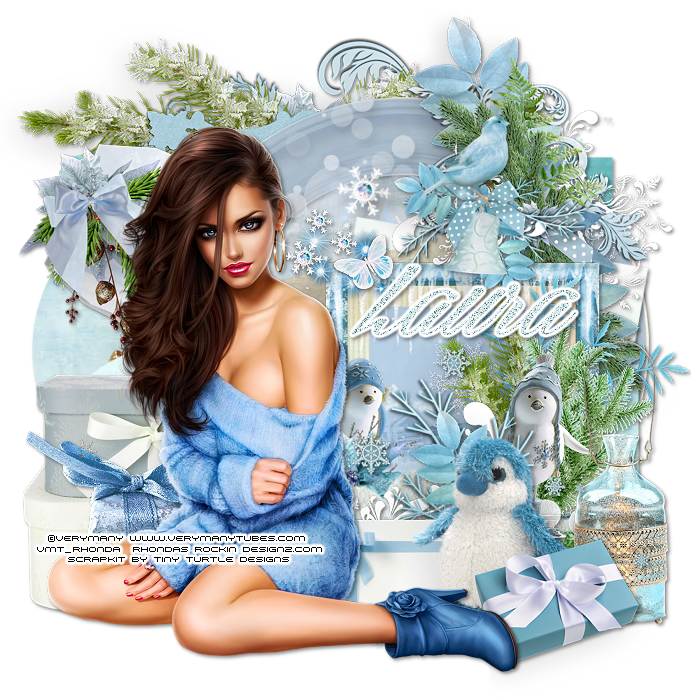
Supplies Needed:
Tube of choice: Im using the wonderful art work of VeryMany
You can purchase their tubes HERE
PTU Scrap Kit by Laura from Tiny Turtle Design called "Winter Ice"
You an purchase this awesome kit at her store HERE
Template #2 by TwytzedT's Playroom HERE
Xero Radiance
Open template - Shift D to duplicate then close out original
Resize all layers 90%
Canvas size 700x700
Delete copyright,stars & dotted lines
paste a paper of choice from the kit - I used paper11
selection invert delete
select none delete the original
paste a paper of choice from the kit - I used paper20
selection invert delete
select none delete the original
paste a paper of choice from the kit - I used paper2
selection invert delete
select none delete the original
paste a paper of choice from the kit - I used paper37
selection invert delete
select none delete the original
paste a paper of choice from the kit - I used paper12
selection invert delete
select none delete the original
paste a paper of choice from the kit - I used paper16
selection invert delete
select none delete the original
paste a paper of choice from the kit - I used paper24
selection invert delete
select none delete the original
paste a paper of choice from the kit - I used paper38
selection invert delete
select none delete the original
paste a paper of choice from the kit - I used paper6
selection invert delete
select none delete the original
Add Xero Radiance with settings of choice
I used the following:
Element 17
Element 20
Element 21
Element 25
Element 33
Element 47
Element 49
Element 51
Element 52
Element 109
Element 110
Element 115
Merge your layers
Place your name where you like it
Add the Copyright and your License Number for the tube
Resize to your liking and save as PNG
This tutorial was created on December 25,2013 by Rhonda
Any resemblance to another Tag or Tutorial is purely coincidental

Supplies Needed:
Tube of choice: I'm using the wonderful art work of Keith Garvey
This tube was purchased at PTE which has closed
You can purchase these tubes at his store HERE
FTU Cluster Items at Mago74 HERE
Scroll down to find the clusters
Mask #157 by Vaybs HERE
Don't forget to leave a thank you when downloading
Open blank canvas size 700x700
Open element 2 & resize 22%
Paste cluster in center of canvas
Place tube in center of frame
Open element 7 - resize 17% and place to left of frame
Mirror this element
Open element 1 - resize 12% & paste behind frame on right hand side
Open element 6 - resize 14% & place to top of left frame
Using the deform tool rotate the bow a little to the left
Open new layer and flood fill with color#94121A
Apply noise with Gaussian 65
Open mask and apply
Add the Copyright and your License Number for the tube
Resize to your liking and save as PNG
This tutorial was created on December 14,2013 by Rhonda
Any resemblance to another Tag or Tutorial is purely coincidental

Supplies Needed:
Tube of choice: Im using the wonderful art work of Elias Chatzoudis
This tube was a Christmas Gift from PTE which has closed
You can purchase his tubes at his store HERE
FTU Scrap Kit by Gimptastic Scraps HERE
FTU Cluster frame by Gimptastic Scraps HERE
Mask of choice
Don't forget to leave a thank you when downloading
Xero Radiance
Open cluster frame - Shift D to duplicate & close original
Canvas size 700x700
Grab freehand tool and draw around frame
Selections modify expand by 3
Open paper 8 and place as new layer
Selections invert delete
Move paper under frame
Open frame 1 from kit and place behind cluster
Resize 110% & position where desired
Erase any parts not wanted at bottom
Open lights and place on top of paper in cluster
Erase parts outide frame
Place tube in frame to right
Apply Xero Radiance with settings of choice
Open sign - resize 78% - place to far right of tag
Open snowman - resize 65% - place beside sign
Open leaves - resize 40% - place behind smowman
Open holly - resize 42% - place to the top between wording to right on cluster
Create new layer under tag
Selections select all on new layer
Open paper 5 & paste into selection
Apply mask of choice
Add the Copyright and your License Number for the tube
Resize to your liking and save as PNG
This tutorial was created on November 30,2013 by Rhonda
Any resemblance to another Tag or Tutorial is purely coincidental
Tuesday, December 24, 2013

Supplies Needed:
Tube of choice: Im using the wonderful art work of Keith Garvey
You can purchase his work at his store HERE
FTU Scrap Kit by Clarez Creationz HERE
Template #155 by Millie HERE
Don't forget to leave a thank you when downloading
Xero Radiance
Penta Color Dot
PhotEffex Scanlines
Xero Fritillary
Filters Unliminted Fine Cotton Paper
Open template - Shift D to duplicate then close out original
Canvas 700x700
Deleted copyright & 2013 numbers
apply Xero Fritillary with setings of choice
paste a paper of choice from the kit - I used paper11
selection invert delete
select none delete the original
apply Penta Color Dot with settings of choice
paste a paper of choice from the kit - I used paper7
selection invert delete
select none delete the original
apply Filters Unliminted Fine Cotton Paper
paste a paper of choice from the kit - I used paper8
selection invert delete
select none delete the original
apply PhotoEffex Scanlines with settings of choice
apply Eyecandy Gradient Glow
Xero Radiance with settings of choice
I used the following:
2014
Ball
Bubbles
Discoball 2
Fireworks
Glasses
Hats 1&2
Poppers 1
Star
Streamer 1&2
Add the Copyright and your License Number for the tube
Resize to your liking and save as PNG
This tutorial was created on December 24,2013 by Rhonda
Any resemblance to another Tag or Tutorial is purely coincidental
Sunday, December 8, 2013

Supplies Needed:
Tube of choice: Im using the wonderful art work of Gennadiy Koufay
This tube was purchased at CILM which has closed
I'm not sure where she is selling at but her site is HERE
PTU Scrap Collab Kit by Crystal from Crystals Creations called "Holly Jolly Christmas"
You an purchase this awesome kit at Pimp My Tags With Scraps HERE
Template #299 by Missy HERE
Xero Radiance
Open template - Shift D to duplicate then close out original
Resize template 115% all layers checked
Canvas size 700x700
delete copyright,wordart,frame,frame background & rectangle
paste a paper of choice from the kit - I used paper3
selection invert delete
select none delete the original
add noise with settings of choice
paste a paper of choice from the kit - I used paper6
selection invert delete
select none delete the original
paste a paper of choice from the kit - I used paper4
selection invert delete
select none delete the original
paste a paper of choice from the kit - I used paper2
selection invert delete
select none delete the original
Xero Radiance with settings of choice
Element 1
Element 3
Element 4
Element 5
Element 8
Element 15
Element 17
Element 18
Element 21
Element 23
Element 27
Element 29
Element 31
Element 33
Element 37
Element 39
Add the Copyright and your License Number for the tube
Resize to your liking and save as PNG
This tutorial was created on December 7,2013 by Rhonda
Any resemblance to another Tag or Tutorial is purely coincidental
Friday, December 6, 2013

Supplies Needed:
Tube of choice: Im using the wonderful art work of Keith Gravey
You must obtain a license to use his art HERE
PTU Scrapkit Collab Mix & Match - I used the kit from Designs by Sarah called "Santas Naughty Helper"
You an purchase this awesome kit at Pimp My Tags With Scraps HERE
Mask #362 by Weescotslass Creations HERE
Xero Radiance
Open frame 5 and paste as new layer
Rotate frame 90 degrees to right
Click inside frame with magic wand
Selections modify expand by 5
Open mattie 3 and paste as new layer
Selections invert delete
Move paper under frame
Xero Radiance with settings of choice
I used the following:
Bow 3
Brad 1
Branch 1
Flower 1&2
Frame 4
Ribbon 3&5
Tree 1
Wordart 3
Open paper 1 & apply mask of choice
Add the Copyright and your License Number for the tube
Resize to your liking and save as PNG
This tutorial was created on December 6,2013 by Rhonda
Any resemblance to another Tag or Tutorial is purely coincidental

Supplies Needed:
Tube of choice: Im using the wonderful art work of Ismael Rac
You can purchase his work at his store HERE
Exclusive Scrap Kit by Jen HERE
Exclusive Template by MommyTwice0411 HERE
Exclusive Wordart by tweety HERE
Exclusive Mask by Tika HERE
Don't forget to leave a thank you when downloading
TY Chicks for all these wonderful goodies!!!!!!!!!!!!!!
If you are not already a member of our forum we would love to have you join
You can find our home HERE
Xero Radiance
Eyecandy 4000 Gradient Glow
Open template - Shift D to duplicate then close out original
Resize all layers 85%
Canvas size 700x700
Delete copyright
paste a paper of choice from the kit - I used paper5
selection invert delete
select none delete the original
paste a paper of choice from the kit - I used paper2
selection invert delete
select none delete the original
paste a paper of choice from the kit - I used paper8
selection invert delete
select none delete the original
paste a paper of choice from the kit - I used paper3
selection invert delete
select none delete the original
paste closeup of tube you are using inside frame
selection invert delete
select none delete the original
apply Xero Radiance with setting of choice
Add Xero Radiance with settings of choice
I used the following:
Decor
Glitter
Lantern
Snowflake Ornament
Tree 1
Open paper 10 & apply mask
Add the Copyright and your License Number for the tube
Resize to your liking and save as PNG
This tutorial was created on December 5,2013 by Rhonda
Any resemblance to another Tag or Tutorial is purely coincidental

Supplies Needed:
Tube of choice: Im using the wonderful art work of Keith Garvey
You can purchase his tubes at his store HERE
PTU Scrap Kit by Laura from Tiny Turtle Design called "Christmas Fun"
You an purchase this awesome kit at her store HERE
Collab Template # by Millie & Denz HERE
Mask of choice
Xero Radiance
Open template - Shift D to duplicate then close out original
Canvas 700x700
Delete copyright,dotted lines,rasters 4&5
paste a paper of choice from the kit - I used paper16
selection invert delete
select none delete the original
paste a paper of choice from the kit - I used paper41
selection invert delete
select none delete the original
paste a paper of choice from the kit - I used paper37
selection invert delete
select none delete the original
paste a paper of choice from the kit - I used paper12
selection invert delete
select none delete the original
paste a paper of choice from the kit - I used paper19
selection invert delete
select none delete the original
paste a paper of choice from the kit - I used paper28
selection invert delete
select none delete the original
paste a paper of choice from the kit - I used paper22
selection invert delete
select none delete the original
paste a paper of choice from the kit - I used paper15
selection invert delete
select none delete the original
Add Xero Radiance with settings of choice
I used the following:
Element 11
Element 18
Element 21
Element 26
Element 41
Element 50
Element 64
Element 74
Element 87
Element 89
Element 97
Element 112
Element 113
Element 114
Element 119
Element 141
Open paper 2 & apply mask of choice
Add the Copyright and your License Number for the tube
Resize to your liking and save as PNG
This tutorial was created on December 5,2013 by Rhonda
Any resemblance to another Tag or Tutorial is purely coincidental

Supplies Needed:
Tube of choice: Im using the wonderful art work of Zlata_M
You can purchase these tubes at PFD HERE
FTU Cluster frame by Kim L's Creations HERE
Mask of choice
Don't forget to leave a thank you when downloading
Xero Radiance
Filters Unliminted Fine Canvas
Filters Unliminted Fine Cotton Paper
Penta Dot & Cross
Open cluster frame - Shift D to duplicate & close original
Canvas size 700x700
Grab freehand tool and draw around frame
Create new layer under frame & flood fill with graidient of choice
Apply Filters Unliminted Fine Canvas with default settings
Apply Penta Dot & Cross with settings of choice
Place tube in frame
Apply Xero Radiance with settings of choice
Create new layer under tag
Add a solid color of choice
Apply Mask
Apply Filters Unliminted Fine Cotton Paper at default settings
Apply Weave Effect with settings of choice
Add the Copyright and your License Number for the tube
Resize to your liking and save as PNG
This tutorial was created on December 1,2013 by Rhonda
Any resemblance to another Tag or Tutorial is purely coincidental
Thursday, December 5, 2013

Supplies Needed:
Tube of choice: Im using the wonderful art work of Very Many
You can purchase this work at their store HERE
FTU Scrap Kit by Jen from Sweets Temptations called "12 days of Christmas 2013"
This kit will be available December 14 on her blog HERE
This is a muti day kit so don't miss a day to get the entire kit!!!!!
Template #144 by Punky Butts HERE
Don't forget to leave a thank you when downloading
Xero Radiance
Open template - Shift D to duplicate then close out original
Canvas size 700x700
delete copyright & wordart
I also deleted some of the frames
On the frame layers I added a solid color then added noise
paste a paper of choice from the kit - I used paper33
selection invert delete
select none delete the original
paste a paper of choice from the kit - I used paper2
selection invert delete
select none delete the original
paste a paper of choice from the kit - I used paper27
selection invert delete
select none delete the original
paste a paper of choice from the kit - I used paper28
selection invert delete
select none delete the original
paste a paper of choice from the kit - I used paper8
selection invert delete
select none delete the original
paste a paper of choice from the kit - I used paper25
selection invert delete
select none delete the original
paste a paper of choice from the kit - I used paper13
selection invert delete
select none delete the original
paste a paper of choice from the kit - I used paper1
selection invert delete
select none delete the original
paste a paper of choice from the kit - I used paper13
selection invert delete
select none delete the original
paste a paper of choice from the kit - I used paper1
selection invert delete
select none delete the original
paste a paper of choice from the kit - I used paper7
selection invert delete
select none delete the original
Xero radiance with settings of choice
I used the following:
House 4
Letter
Mailbox
Ornaments
Post Box
Letter to Santa
Bells 2
Decor
Gifts 1
Bag 3
Drink
Ribbon 1
Add the Copyright and your License Number for the tube
Resize to your liking and save as PNG
This tutorial was created on December 5,2013 by Rhonda
Any resemblance to another Tag or Tutorial is purely coincidental
Friday, November 29, 2013

Supplies Needed:
Tube of choice: Im using the wonderful art work of Alex Prihodko
You must obtain a license to use this art at PFD HERE
PTU Scrap Kit from Designs by Sarah called "Holiday Ice"
You an purchase this awesome kit at Pimp My Tags With Scraps HERE
Template #4 from TwyztedT's Playroom HERE
Winter Mask #10 by Dee HERE
Open template - Shift D to duplicate then close out original
Resize all layers 90%
Canvas size 700x700
delete copyright,rasters 8,9&10 & dotted circles
paste a paper of choice from the kit - I used paper1
selection invert delete
select none delete the original
paste a paper of choice from the kit - I used paper11
selection invert delete
select none delete the original
paste a paper of choice from the kit - I used paper12
selection invert delete
select none delete the original
paste a paper of choice from the kit - I used paper8
selection invert delete
select none delete the original
paste a paper of choice from the kit - I used paper2
selection invert delete
select none delete the original
I used the following:
Branch
Button 3
Deer
Flakes
Ornament 2
Snowflake
Ice tree
Ice Tree 3
Open paper 6 & apply mask of choice
Add the Copyright and your License Number for the tube
Resize to your liking and save as PNG
This tutorial was created on November 29,2013 by Rhonda
Any resemblance to another Tag or Tutorial is purely coincidental

Supplies Needed:
Tube of choice: Im using the wonderful art work of Alex Prihodko
You can purchase his tubes at Pics for Design HERE
PTU Scrap Kit by Mizteeque from called "CafeAuLait"
You an purchase this awesome kit HERE
Template #446 by Missy HERE
Mask #156 by Vaybs HERE
Don't forget to leave a thank you when downloading
Xero Radiance
Eyecandy Gradient Glow
Open template - Shift D to duplicate then close out original
Canvas size 700x700
Delete copyright,rounded edge rect2&3,frameback2,frame2,thin rect1&2,circle 5,7&8
add new layer & flood fill with solid color of choice
select none delete the original
add noise with settings of choice
paste a paper of choice from the kit - I used paper4
selection invert delete
select none delete the original
paste a paper of choice from the kit - I used paper4
selection invert delete
select none delete the original
paste a paper of choice from the kit - I used paper3
selection invert delete
select none delete the original
paste a paper of choice from the kit - I used paper3
selection invert delete
select none delete the original
add new layer & flood fill with solid color of choice
select none delete the original
add noise with settings of choice
add new layer & open element 48
paste into selection
select none delete the original
paste a paper of choice from the kit - I used paper1
selection invert delete
select none delete the original
add new layer & flood fill with solid color of choice
select none delete the original
add noise with settings of choice
paste a paper of choice from the kit - I used paper2
selection invert delete
select none delete the original
Repeat the Radiance settings
I used the following:
Element 1
Element 2
Element 4
Element 11
Element 15
Element 18
Element 21
Element 25
Element 27
Element 30
Element 36
Element 40
Element 42
Element 54
Open paper 9 & apply mask of choice
Add the Copyright and your License Number for the tube
Resize to your liking and save as PNG
This tutorial was created on November 29,2013 by Rhonda
Any resemblance to another Tag or Tutorial is purely coincidental
Tuesday, November 26, 2013

Supplies Needed:
Tube of choice: Im using the wonderful art work of Pinup Toons
You can purchase his tubes at CDO HERE
FTU Scrap Kit by Dee HERE
Template #428 by Millie HERE
Mask #157 by Vaybs HERE
Don't forget to leave a thank you when downloading
Xero Radiance
Eyecandy Gradient Glow for wordart
Open template - Shift D to duplicate then close out original
Canvas size 700x700
Delete copyright,layers 9&10
I added borders around some of my layers for the effect
paste a paper of choice from the kit - I used paper11
selection invert delete
select none delete the original
paste a paper of choice from the kit - I used paper6
selection invert delete
select none delete the original
paste a paper of choice from the kit - I used paper18
selection invert delete
select none delete the original
paste a paper of choice from the kit - I used paper7
selection invert delete
select none delete the original
paste a paper of choice from the kit - I used paper1
selection invert delete
select none delete the original
paste a paper of choice from the kit - I used paper3
selection invert delete
select none delete the original
apply Xero Radinace wih settings of choice
apply Xero radiance with settings of choice
I used the following:
Bird 2
Bottle
Bow 2
Butterfly
Button 2
Clock
Dragonfly
Flower 1,2,4&5
Frame 6
Glitter 1
LaceYoyo 1&2
Leaf 3
Netting
PotpouriJar
Purse 2
Ribbon 2
Spray
Tag 2
Wordart 2&3
Open paper 13 & apply mask
Add the Copyright and your License Number for the tube
Resize to your liking and save as PNG
This tutorial was created on November 25,2013 by Rhonda
Any resemblance to another Tag or Tutorial is purely coincidental
Monday, November 25, 2013

Sunday, November 24, 2013

Supplies Needed:
Tube of choice: Im using the wonderful art work of Keith Garvey
This tube was a 2010 freebie from MPT which has closed
You must obtain a license to use his art HERE
PTU Scrap Kit from Pimp'd Designz called "Christmas Traditions"
You an purchase this awesome kit at Pimp My Tags With Scraps HERE
Christmas Mask #3 by Vix HERE
Open blank canvas 700x700
Open frame 1 and place in center
Click inside frame with magic wand
Selections modify expand by 6
Open paper 10 & paste as new layer
Selections invert delete
Move paper under frame
apply Xero Radiance with settings of choice
I used:
Cut Out 2&3
Flower 1&2
Holly 2
Music Sheet
Ribbon 4
Snowman
Stamp
Tree
Open paper 7 & apply mask of choice
Add the Copyright and your License Number for the tube
Resize to your liking and save as PNG
This tutorial was created on November 25,2013 by Rhonda
Any resemblance to another Tag or Tutorial is purely coincidental

Supplies Needed:
Tube of choice: Im using the wonderful art work of Ninaste
You must obtain a license to use this art at Beehive Studio HERE
PTU Scrap Kit by Laura from Tiny Turtle Design called "Christmas Daisy Fairy"
You an purchase this awesome kit at her store HERE
Christmas Template #1 by Flaminsal HERE
Open template - Shift D to duplicate then close out original
Delete copyright & dotted rectangles
paste a paper of choice from the kit - I used paper55
selection invert delete
select none delete the original
paste a paper of choice from the kit - I used paper19
selection invert delete
select none delete the original
paste a paper of choice from the kit - I used paper42
selection invert delete
select none delete the original
paste a paper of choice from the kit - I used paper41
selection invert delete
select none delete the original
paste a paper of choice from the kit - I used paper29
selection invert delete
select none delete the original
paste a paper of choice from the kit - I used paper58
selection invert delete
select none delete the original
I used the following:
Element 11
Element 13
Element 15
Element 24
Element 27
Element 35
Element 38
Element 40
Element 42
Element 57
Element 69
Element 74
Element 76
Element 106
Element 113
Element 115
Element 123
Element 124
Element 127
Element 131
Add the Copyright and your License Number for the tube
Resize to your liking and save as PNG
This tutorial was created on November 24,2013 by Rhonda
Any resemblance to another Tag or Tutorial is purely coincidental

Supplies Needed:
Tube of choice: Im using the wonderful art work of Jamie Kidd
You can purchase these tubes at CDO HERE
3 Cluster Frames by Real Life Scrapped HERE
These are limited downloads - You need to scroll to bottom of page
Grunge Texture HERE
Mask#362 by Weescotslass Creations HERE
It is the last one on the page
Xero Porcelin
PhotoEffex Scanlines
Open blank canvas 700x700
Open cluster 1 & resize 20%
Paste as new layer on canvas
Using the selection tool draw around each square of frame
Copy & paste close up of tube you are using - I used a different tube for each square
Do this for all 3 squares
Apply Xero Radiance with default settings to each tube
Merge the tubes as 1 layer
Apply PhotoEffex Scanlines with default settings
Open cluster 3 & resize 16%
Paste as new layer to the bottom right of frame
Move this cluster down slightly
Open cluster 2 & resize 25%
Paste as new layer under cluster frame 1 to the right hand side
You want most of the heart to be showing at top
Merge your layers
Open textue 3 and place as new layer under cluster frames
Merge group
Add the Copyright and your License Number for the tube
Resize to your liking and save as PNG
This tutorial was created on November 16,2013 by Rhonda
Any resemblance to another Tag or Tutorial is purely coincidental
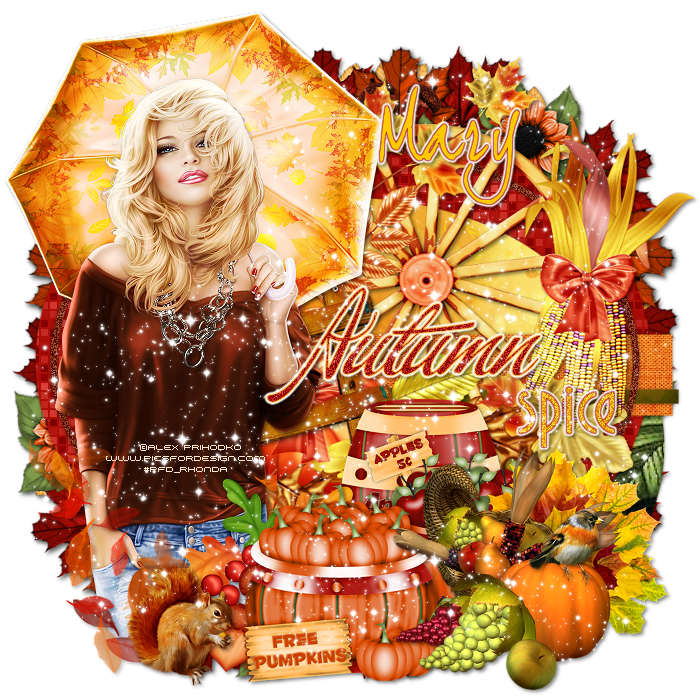
Supplies Needed:
Tube of choice: Im using the wonderful art work of Alex Prihodko
You can purchase his work at PFD HERE
FTU Scrap Kit by Mary HERE
Autumn Template #1 by Brutal Designs HERE
Don't forget to leave a thank you when downloading
Xero Radiance
Eyecandy Gradient Glow
Open template - Shift D to duplicate then close out original
Resize template 90% all layers
Canvas size 700x700
Deleted copyright & layers 8,10&11
paste a paper of choice from the kit - I used paper5
selection invert delete
select none delete the original
paste a paper of choice from the kit - I used paper8
selection invert delete
select none delete the original
paste a paper of choice from the kit - I used paper4
selection invert delete
select none delete the original
paste a paper of choice from the kit - I used paper3
selection invert delete
select none delete the original
paste a paper of choice from the kit - I used paper4
selection invert delete
select none delete the original
add new layer & flood fill with solid color
select none delete the original
add noise with settings of choice
add new layer & flood fill with color of choice
add noise with settings of choice
apply Eyecandy Gradient Glow
Xero Radiance with settings of choice
I used the following:
Acorns
Apple Barrel
Apples
Bird
Cornucopias
Fall Leaves
Frame 3
Ladder
Pumpkin Barrel
Sparkles
Squirel
Wheel Cluster
Add the Copyright and your License Number for the tube
Resize to your liking and save as PNG
This tutorial was created on November 23,2013 by Rhonda
Any resemblance to another Tag or Tutorial is purely coincidental

Supplies Needed:
Tube of choice: Im using the wonderful art work of Alex Prihodko
You can purchase these tubes at PFD HERE
Cluster frame by Kimeric Kreations HERE
Cluster Frame by Trixie Scraps HERE
Xero Porcelin
Filters Unliminted Fine Canvas
Open blank canvas 700x700
Open cluster from Sweet Temptations
Paste as new layer on canvas
Using the selection tool draw around cluster
Pick 2 colors and make a gradient
Create new layer under frame and paste gradient
Apply Filters Unliminted Fine Canvas to paper
Open tube and place inside frame
Apply Xero Rdiance with settings of choice
Open cluster by Kimeric,resize & paste flower to bottom right of tag
Open cluster by Trixie,resize & paste under frame to each side
I dulpicated mine several times and added to top as well
Add the Copyright and your License Number for the tube
Resize to your liking and save as PNG
This tutorial was created on November 24,2013 by Rhonda
Any resemblance to another Tag or Tutorial is purely coincidental
Friday, November 22, 2013

Supplies Needed:
Tube of choice: Im using the wonderful art work of Ismael Rac
You must obtain a license to use his art HERE
PTU Scrap Kit from Candy Cats called "Leaf it to Me"
You an purchase this awesome kit at Pimp My Tags With Scraps HERE
Harvest Template #20 from Dee HERE
Leave a thank you when downloading freebies
Xero Radiance
Open template - Shift D to duplicate then close out original
Resize template 90% all layers
Canvas size 700x700
Delete copyright,small yellow circle & small dotted circle
paste a paper of choice from the kit - I used paper10
selection invert delete
select none delete the original
paste a paper of choice from the kit - I used paper50
selection invert delete
select none delete the original
paste a paper of choice from the kit - I used paper12
selection invert delete
select none delete the original
paste a paper of choice from the kit - I used paper21
selection invert delete
select none delete the original
paste a paper of choice from the kit - I used paper9
selection invert delete
select none delete the original
paste a paper of choice from the kit - I used paper22
selection invert delete
select none delete the original
paste a paper of choice from the kit - I used paper9
selection invert delete
select none delete the original
paste a paper of choice from the kit - I used paper36
selection invert delete
select none delete the original
add new layer & flood fill with color of choice
select none delete the original
add noise with settings of choice
add new layer & flood fill with color of choice
select none delete the original
add noise with settings of choice
add new layer & flood fill with black
select none delete the original
Add closeup of tube inside squares
apply Xero Radiance with settings of choice
Xero Radiance with settings of choice
I used the following:
Element 6
Element 8
Element 9
Element 11
Element 19
Element 20
Element 21
Element 24
Element 25
Element 46
Element 47
Element 48
Element 73
Element 74
Element 78
Element 87
Element 92
Add the Copyright and your License Number for the tube
Resize to your liking and save as PNG
This tutorial was created on November 22,2013 by Rhonda
Any resemblance to another Tag or Tutorial is purely coincidental
Saturday, November 16, 2013

Supplies Needed:
Tube of choice: Im using the wonderful art work of Ninaste
You must obtain a license to use this art at Beehive Studio HERE
PTU Scrap Kit by Laura from Tiny Turtle Design called "Winter Wonderland"
You an purchase this awesome kit at her store HERE
Mask #431 by Vix HERE
Xero Radiance
Open blank canvas 700x700
Open element 49 - resixe and place in center of canvas
Grab the magic wand and click inside frame
Add new layer under frame
Open paper 2 and place inside selection
Selections none
Place tube to right of frame
Apply Xero Radiance with settings of choice
I used:
Element 3
Element 31
Element 47
Element 50
Element 52
Element 70
Element 71
Element 92
Element 98
Open paper 1 & apply mask
Add the Copyright and your License Number for the tube
Resize to your liking and save as PNG
This tutorial was created on November 16,2013 by Rhonda
Any resemblance to another Tag or Tutorial is purely coincidental
Subscribe to:
Posts
(Atom)
Grab My Blinkie

I CT For


Blogs I Visit


