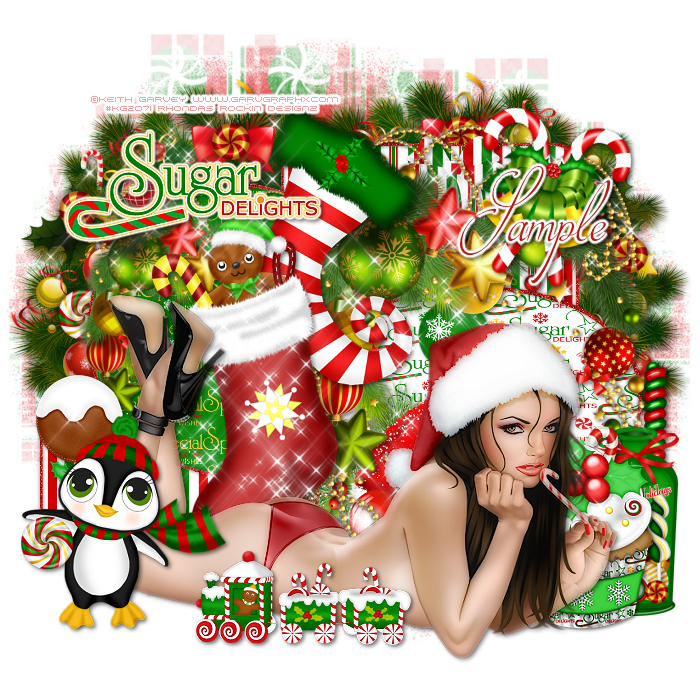
Thursday, December 31, 2015

This tutorial is written for those with knowledge of PSP
Supplies Needed:
Tube of choice: I'm using the wonderful art work of Keith Garvey
You must obtain a license to use HERE
PTU Scrap Kit by Dee called Let's Celebrate
Bundle pack can be purchased HERE
Winter Mask 1 by Brutal Design HERE
Ok Lets get Started:
Open blank canvas 700x700
Open cluster 3 and place in center of tag
Open cluster 4 and place on top
Open word art 2016 and place where desired
I used the following:
Element 5
Element 17
Element 35
Element 77
Merge your layers
Open paper 13 & apply mask
Place your name where you like it
Add the Copyright and your License Number for the tube
Resize to your liking and save as PNG
This tutorial was created on December 31,2015 by Rhonda
Any resemblance to another Tag or Tutorial is purely coincidental


This tutorial is written for those with knowledge of PSP
Supplies Needed:
Tube of choice: I'm using the wonderful art work of VeryMany
You must obtain a license to use their art HERE
FTU Scrap Kit by PinkParadox Productions HERE
Template #287 by Becky's Creations HERE
Kit matches tube
Mask of choice
On borders add any color with noise
Ok Lets get Started:
Open template - Shift D to duplicate then close out original
Increase canvas to 700x700
Delete copyright
Click on bg shape selections,select all, float,defloat
paste a paper of choice from the kit - I used paper19
selection invert delete
select none delete the original
Click on c circle selections,select all, float,defloat
paste a paper of choice from the kit - I used paper11
selection invert delete
select none delete the original
Click on layer 3 selections,select all, float,defloat
paste a paper of choice from the kit - I used paper15
selection invert delete
select none delete the original
Click on R&L shape selections,select all, float,defloat
paste a paper of choice from the kit - I used paper7
selection invert delete
select none delete the original
Click on R&L circle selections,select all, float,defloat
paste a paper of choice from the kit - I used paper16
selection invert delete
select none delete the original
Click on center shape selections,select all, float,defloat
paste a paper of choice from the kit - I used paper18
selection invert delete
select none delete the original
Add close up of tube in the rectangle shape
I duplicated mine 3 times
Change blend mode to overlay or any setting of your choice
Apply PhotoEffex Blind filter
Place tube to center
Now time to add our elements
I used the following:
Element 7
Element 8
Element 17
Element 24
Element 26
Element 50
Element 53
Element 58
Element 64
Element 69
Element 93
Element 153
Element 156
Merge layers
Open paper of choice and apply mask
Place your name where you like it
Add the Copyright and your License Number for the tube
Resize to your liking and save as PNG
This tutorial was created on December 31,2015 by Rhonda
Any resemblance to another Tag or Tutorial is purely coincidental

This tutorial is written for those with knowledge of PSP
Supplies Needed:
Tube of choice: I'm using the wonderful art work of Keith Garvey
You must obtain a license to use this HERE
PTU Scrap Kit by Amalie Designs called Very Merry Bright
This kit can be purchased at Tiny Turtle Designs HERE
Template #6 by Sylly Creationz HERE
Mask of choice
Decorate word art to your liking
Ok Lets get Started:
Open template - Shift D to duplicate then close out original
Resize template to your desired liking
Delete copyright
Click on large green rectangle selections,select all, float,defloat
paste a paper of choice from the kit - I used paper12
selection invert delete
select none delete the original
Click on large red rectangle selections,select all, float,defloat
paste a paper of choice from the kit - I used paper20
selection invert delete
select none delete the original
Click on 2 black rectangle selections,select all, float,defloat
paste a paper of choice from the kit - I used paper8
selection invert delete
select none delete the original
Click on long green rectangle selections,select all, float,defloat
paste a paper of choice from the kit - I used paper10
selection invert delete
select none delete the original
Click on L&R red rectangles selections,select all, float,defloat
paste a paper of choice from the kit - I used paper21
selection invert delete
select none delete the original
Click on red center rectangle selections,select all, float,defloat
paste a paper of choice from the kit - I used paper13
selection invert delete
select none delete the original
Click on black rectangle selections,select all, float,defloat
paste a paper of choice from the kit - I used paper1
selection invert delete
select none delete the original
Place your tube
Now time to add our elements
I used the following:
Element 1
Element 2
Element 4
Element 8
Element 19
Element 25
Element 26
Element 31
Element 37
Element 39
Element 46
Element 48
Element 52
Element 60
Merge your layers
Open paper of choice and apply mask
Place your name where you like it
Add the Copyright and your License Number for the tube
Resize to your liking and save as PNG
This tutorial was created on December 31,2015 by Rhonda
Any resemblance to another Tag or Tutorial is purely coincidental
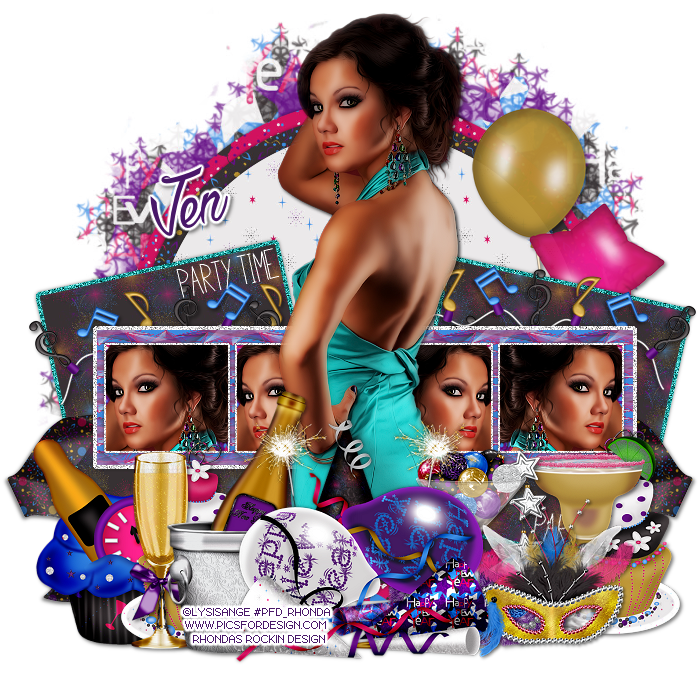
This tutorial is written for those with knowledge of PSP
Supplies Needed:
Tube of choice: I'm using the wonderful art work of Lysisange
Which you must obtain a license to use at PFD HERE
PTU Scrapkit by Jen from Sweet Temptations called "All Yaer Round"
You can purchase this awesome kit from one of her stores HERE
Template #3 by Brutal Design HERE
Mask by Kisses N Dreams HERE
Ok Lets get Started:
Open template - Shift D to duplicate then close out original
Delete copyright,bottle & shape
Click on ellipse 2 selections,select all, float,defloat
paste a paper of choice from the kit - I used paper8
selection invert delete
select none delete the original
Click on ellipse 3 selections,select all, float,defloat
paste a paper of choice from the kit - I used paper1
selection invert delete
select none delete the original
Click on ellipse 1 selections,select all, float,defloat
paste a paper of choice from the kit - I used paper6
selection invert delete
select none delete the original
Click on rectangle 1 & copy selections,select all, float,defloat
paste a paper of choice from the kit - I used paper5
selection invert delete
select none delete the original
add border with noise
Click on rectangle 2 selections,select all, float,defloat
paste a paper of choice from the kit - I used paper10
selection invert delete
select none delete the original
add border with noise
Click on rectangle 3 & all copies selections,select all, float,defloat
paste a paper of choice from the kit - I used paper7
selection invert delete
select none delete the original
Place close-up of tube in each frame
I added a border with noise to rectangle and frames
Place your main tube
Now time to add our elements
I used the following:
Balloons 1
Bucket N Bottle
Cake
Champagne Glass
Cupcake 1
Decor 1
Glass
Ribbon 1
Merge your layers
Open paper of choice and apply mask
Place your name where you like it
Add the Copyright and your License Number for the tube
Resize to your liking and save as PNG
This tutorial was created on December 31,2015 by Rhonda
Any resemblance to another Tag or Tutorial is purely coincidental
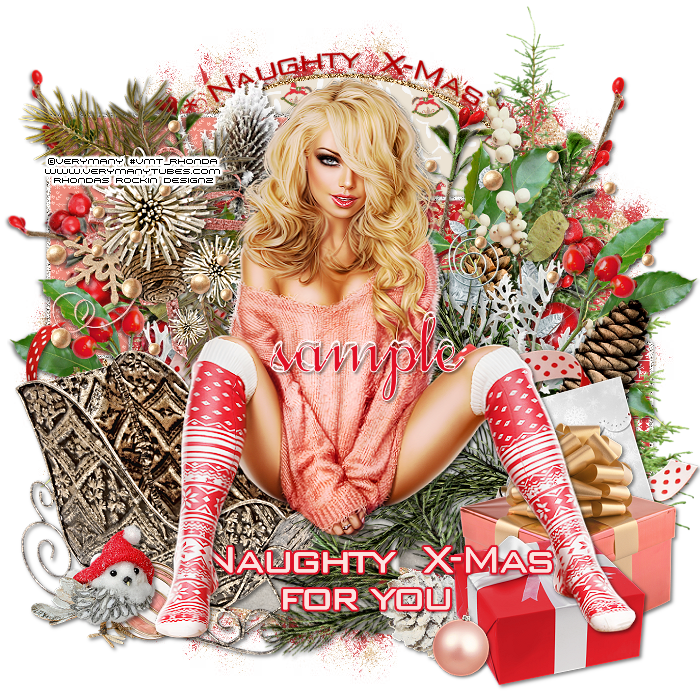
Wednesday, December 30, 2015

This tutorial is written for those with knowledge of PSP
Supplies Needed:
Tube of choice: I'm using the wonderful art work of Stan Dudin
You must obtain a license to use at PFD HERE
PTU Scrap Kit by Jens Sweet Temptations called Party Like It's Christmas
You can purchase this kit from one of her stores HERE
Mask of choice
Ok Lets get Started:
Open blank canvas 700x700
Place tube to center of canvas
We are going to add our elements around the tube
I used the following:
Bag
Bauble 1
Bells
Bird
Bottle
Branch 2
candle
Cat n Bauble
Decor 4
Drink
Fame 1
Gift 1&2
Stocking
Merge your layers
Open paper of choice & apply mask
Place your name where you like it
Add the Copyright and your License Number for the tube
Resize to your liking and save as PNG
This tutorial was created on December 30,2015 by Rhonda
Any resemblance to another Tag or Tutorial is purely coincidental
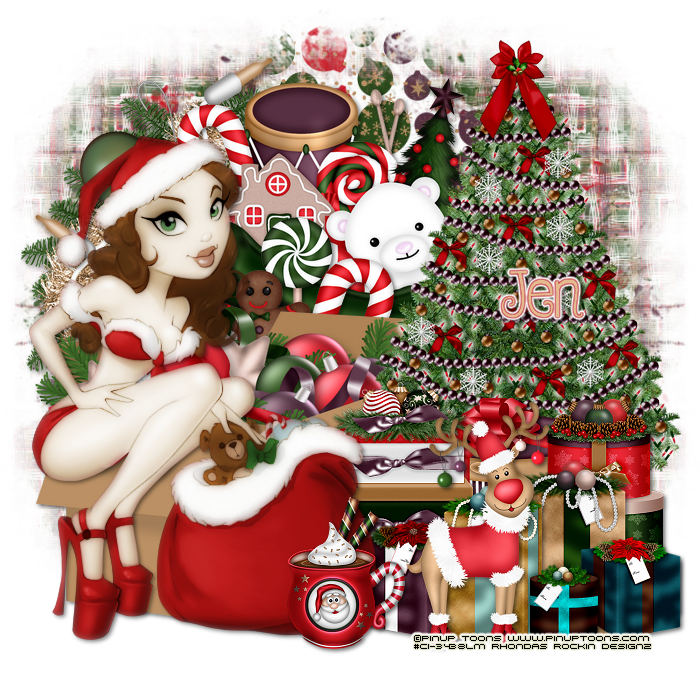
This tutorial is written for those with knowledge of PSP
Supplies Needed:
Tube of choice: I'm using the wonderful art work of PinUp Toons
You must obtain a license to use at CDO HERE
PTU Scrap Kit by Jens Sweet Temptations called Dec 25th
You can purchase this kit from one of her stores HERE
Mask of choice
Ok Lets get Started:
Open blank canvas 700x700
Place tube to left hand side of canvas
We are going to add our elements around the tube
I used the following:
Bag 1&2
Candy 1
Decor
Gift Box
Gift
Gift 3
Gifts 1,2&3
Rudy
Sack
Tree
Wreath
Merge your layers
Open paper of choice & apply mask
Place your name where you like it
Add the Copyright and your License Number for the tube
Resize to your liking and save as PNG
This tutorial was created on December 30,2015 by Rhonda
Any resemblance to another Tag or Tutorial is purely coincidental

This tutorial is written for those with knowledge of PSP
Supplies Needed:
Tube of choice: I'm using the wonderful art work of Alehandra Vanhek
You must obtain a license to use this art HERE
FTU Scrap Kit by Clarez Creationz HERE
Template by Biene HERE
Mask of choice
Ok Lets get Started:
Open template - Shift D to duplicate then close out original
Increase canvas size to 700x700
Delete copyright
Click on circles selections,select all, float,defloat
paste a paper of choice from the kit - I used paper1
selection invert delete
select none delete the original
add border with noise
Click on starback L&R selections,select all, float,defloat
paste a paper of choice from the kit - I used paper9
selection invert delete
select none delete the original
add noise
I left star frames as they were
Click on rectangle back L&R selections,select all, float,defloat
paste a paper of choice from the kit - I used paper7
selection invert delete
select none delete the original
I added a close-up of tube inside the rectangles
I added noise to frame rectangles
Place your tube
I didn't add any elements but feel free to add
Merge your layers
Open paper of choice and apply any mask
Place your name where you like it
Add the Copyright and your License Number for the tube
Resize to your liking and save as PNG
This tutorial was created on December 28,2015 by Rhonda
Any resemblance to another Tag or Tutorial is purely coincidental

This tutorial is written for those with knowledge of PSP
Supplies Needed:
Tube of choice: I'm using the wonderful art work of VeryMany
You must obtain a license to use their art HERE
FTU Scrap Kit by Disturbed Scraps HERE
Word Art by Scraps and Tubes HERE
Mask of choice if desired
Ok Lets get Started:
This is a very quick and easy tutorial
Open element 65 & place in center of tag
Place close up of tube inside frame
Change blend mode to Luminious Legacy
Place your tube
Now time to add our elements
I used the following:
Element 12
Element 20
Element 25
Element 27
Element 37
Element 42
Element 44
Element 45
Element 52
Element 56
Merge your layers
Place your name where you like it
Add the Copyright and your License Number for the tube
Resize to your liking and save as PNG
This tutorial was created on December 27,2015 by Rhonda
Any resemblance to another Tag or Tutorial is purely coincidental

This tutorial is written for those with knowledge of PSP
Supplies Needed:
Tube of choice: I'm using the wonderful art work of VeryMany
Which you must obtain a license to use HERE
PTU Scrap Kit by Aurelie from Purple Dreams Scraps called "New Years Wish"
You an purchase this awesome kit from one of her stores HERE
Mask of choice
Ok Lets get Started:
This is a very quick and easy tutorial
Open element 40 & place in center of tag
Open element 39 & place on top
Open element 27 & place on top
Grab the magic wand & click inside frame
Selections modify expand by 10
Add new layer under frame
Open paper 2 & paste into selections
Place your tube
Now time to add our elements
I used the following:
Element 2
Element 14
Element 15
Element 16
Element 18
Element 20
Element 35
Element 47
Element 50
Element 52
Element 53
Element 54
Element 69
Element 84
Merge your layers
Open paper of choice and apply mask
Place your name where you like it
Add the Copyright and your License Number for the tube
Resize to your liking and save as PNG
This tutorial was created on December 28,2015 by Rhonda
Any resemblance to another Tag or Tutorial is purely coincidental

This tutorial is written for those with knowledge of PSP
Supplies Needed:
Tube of choice: Im using the wonderful art work of Keith Garvey
Which you must obtain a license to use HERE
FTU Scrap Kit by GoF Designs HERE
Kit is Happy New year
Mask of choice
Ok Lets get Started:
This is a very quick and easy tutorial
Open element 51 & place in center of tag
Grab the magic wand & click inside frame
Selections modify expand by 10
Add new layer under frame
Open paper 2 & paste into selections
Place your tube
Now time to add our elements
I used the following:
Element 7
Element 17
Element 19
Element 32
Element 33
Element 34
Element 36
Element 38
Element 40
Element 42
Element 64
Element 65
Element 73
Element 75
Merge your layers
Open paper of choice and apply mask
Place your name where you like it
Add the Copyright and your License Number for the tube
Resize to your liking and save as PNG
This tutorial was created on December 30,2015 by Rhonda
Any resemblance to another Tag or Tutorial is purely coincidental
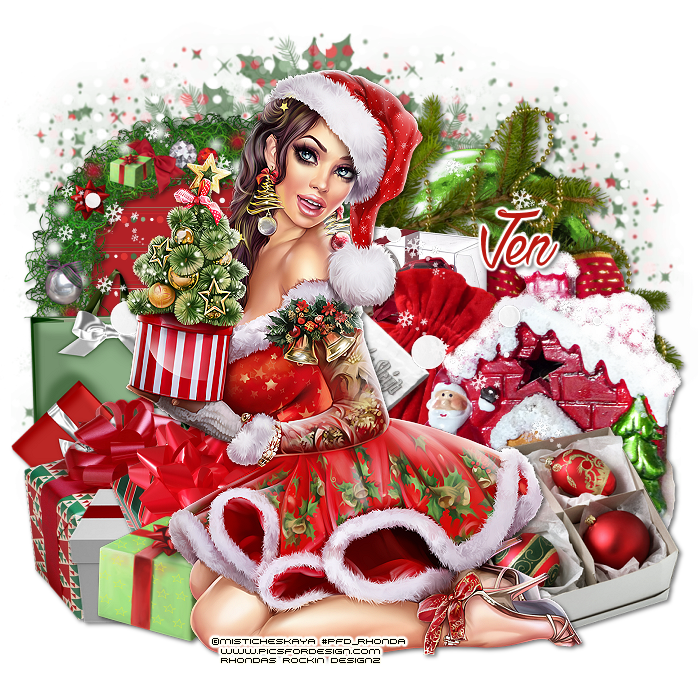
Thursday, December 24, 2015

This tutorial is written for those with knowledge of PSP
Supplies Needed:
Tube of choice: I'm using the wonderful art work of Misticheskaya
You must obtain a license to use this art at PFD HERE
PTU Scrap Kit by Purple Dreams Scraps called Christmas Joy
You can purchase this kit from one of her stores HERE
Template #5 by Sylly Creationz HERE
Mask #3 by Tags by Tika HERE
Decorate word art to your liking
Ok Lets get Started:
Open template - Shift D to duplicate then close out original
Resize template to your desired liking
Delete copyright, naughty pixel text and hohoho pixel text
Click on blk rectangle L&R selections,select all, float,defloat
paste a paper of choice from the kit - I used paper8
selection invert delete
select none delete the original
Click on green rectangle L&R selections,select all, float,defloat
paste a paper of choice from the kit - I used paper4
selection invert delete
select none delete the original
Click on red rectangle L&R selections,select all, float,defloat
paste a paper of choice from the kit - I used paper11
selection invert delete
select none delete the original
Click on blk square L&R selections,select all, float,defloat
paste a paper of choice from the kit - I used paper1
selection invert delete
select none delete the original
Click on green circle selections,select all, float,defloat
paste a paper of choice from the kit - I used paper7
selection invert delete
select none delete the original
Click on small red circle selections,select all, float,defloat
paste a paper of choice from the kit - I used paper6
selection invert delete
select none delete the original
Click on small black circle selections,select all, float,defloat
paste a paper of choice from the kit - I used paper3
selection invert delete
select none delete the original
Place your tube
Now time to add our elements
I used the following:
Element 1
Element 4
Element 5
Element 18
Element 19
Element 20
Element 25
Element 26
Element 27
Element 30
Element 31
Element 43
Element 50
Element 74
Element 76
Element 79
Merge your layers
Open paper of choice and apply mask
Place your name where you like it
Add the Copyright and your License Number for the tube
Resize to your liking and save as PNG
This tutorial was created on December 24,2015 by Rhonda
Any resemblance to another Tag or Tutorial is purely coincidental

This tutorial is written for those with knowledge of PSP
Supplies Needed:
Tube of choice: I'm using the wonderful art work of Vi Nina
You must obtain a license to use his art at S&Co HERE
PTU Scrapkit by Purple Dreams Scraps called Let It Snow
Kit can be purchased at one of her stores HERE
Template #460 by Millie HERE
Mask of choice
Ok Lets get Started:
Open template - Shift D to duplicate then close out original
Resize template 120% all layers
Increase canvas to 700x700
Delete copyright
Click on layer 1 selections,select all, float,defloat
paste a paper of choice from the kit - I used paper11
selection invert delete
select none delete the original
add border with noise
Click on layer 2 selections,select all, float,defloat
paste a paper of choice from the kit - I used paper7
selection invert delete
select none delete the original
Click on layer 3 selections,select all, float,defloat
paste a paper of choice from the kit - I used paper15
selection invert delete
select none delete the original
add border with noise
Click on layer 4 selections,select all, float,defloat
paste a paper of choice from the kit - I used paper13
selection invert delete
select none delete the original
Click on layer 5 selections,select all, float,defloat
paste a paper of choice from the kit - I used paper1
selection invert delete
select none delete the original
add border with noise
Click on layer 6 selections,select all, float,defloat
paste a paper of choice from the kit - I used paper9
selection invert delete
select none delete the original
add border with noise
Place tube to center
Now time to add our elements
I used the following:
Element 4
Element 8
Element 11
Element 22
Element 25
Element 26
Element 27
Element 37
Element 40
Element 41
Element 42
Element 44
Element 45
Element 52
Element 53
Element 55
Merge layers
Open paper of choice and apply mask
Place your name where you like it
Add the Copyright and your License Number for the tube
Resize to your liking and save as PNG
This tutorial was created on December 24,2015 by Rhonda
Any resemblance to another Tag or Tutorial is purely coincidental
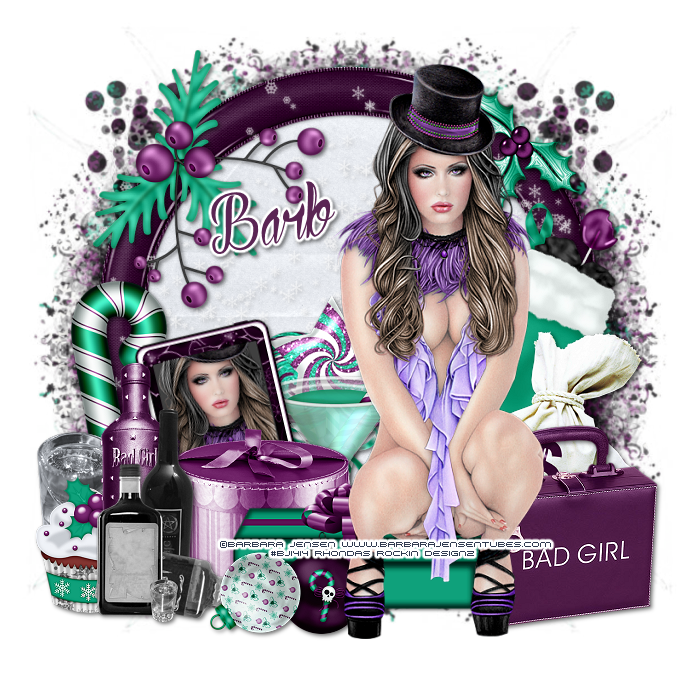
This tutorial is written for those with knowledge of PSP
Supplies Needed:
Tube of choice: I'm using the wonderful art work of Barbara Jensen
You must obtain a license to use HERE
FTU Scrap Kit by Manipulated by Magik HERE
Mask of choice
Ok lets get started:
This is a very quick and easy tutorial
Open frame 6 & place to center of tag
Grab the magic wand & click inside frame
Selections modify expand by 10
Add new layer under frame
Open paper 1 & paste into selections
Select none
Place your tube
Now time to add our elements
I used the following:
Bauble 1&2
Bottle
Candy Cane
Candy Pops
Case
Cupcake
Gift
Gift Box
Holly
Liquor
Mistletoe
Money Bag
Peppermint Cocktail
Phone
Shot Glass
Star
Stocking
Merge your layers
Open paper of choice & apply mask
Place your name where you like it
Add the Copyright and your License Number for the tube
Resize to your liking and save as PNG
This tutorial was created on December 24,2015 by Rhonda
Any resemblance to another Tag or Tutorial is purely coincidental

This tutorial is written for those with knowledge of PSP
Supplies Needed:
Tube of choice: I'm using the wonderful art work of Zebrush
You must obtain a license to use at PFD HERE
PTU Scrap Kit by Niqui's Designs called Xmas Fun HERE
Mask of choice
Resize elements to your liking
Ok Lets get Started:
Open blank canvas 700x700
Open element 43 and place to center
Using magic wand click inside frame
Selections modify expand by 10
Open paper 15 and paste as new layer
Selections invert delete
Move paper under frame
Place tube to left of frame
Now time to add our elements of choice
I used the following:
Element 1
Element 2
Element 6
Element 10
Element 22
Element 26
Element 27
Element 30
Element 31
Element 38
Element 50
Element 54
Element 66
Merge your layers
Open paper of choice & apply mask
Place your name where you like it
Add the Copyright and your License Number for the tube
Resize to your liking and save as PNG
This tutorial was created on December 23,2015 by Rhonda
Any resemblance to another Tag or Tutorial is purely coincidental
This tutorial is written for those with knowledge of PSP
Supplies Needed:
Tube of choice: I'm using the wonderful art work of VeryMany
Which you must obtain a license to use at PFD HERE
FTU Scrapkit by PinkParadox Productions HERE
Naughty Xmas Template by Biene HERE
Mask of choice
Ok Lets get Started:
Open template - Shift D to duplicate then close out original
Delete copyright & stars
Click on circle selections,select all, float,defloat
paste a paper of choice from the kit - I used paper10
selection invert delete
select none delete the original
add border with noise
Click on square left selections,select all, float,defloat
paste a paper of choice from the kit - I used paper19
selection invert delete
select none delete the original
add border with noise
Click on square right selections,select all, float,defloat
paste a paper of choice from the kit - I used paper23
selection invert delete
select none delete the original
add border with noise
Click on rectangle selections,select all, float,defloat
paste a paper of choice from the kit - I used paper22
selection invert delete
select none delete the original
Ad noise to frame rectangle
Decorate word art to your liking
Place your tube
Xero Radiance with settings of choice
Now time to add our elements
I used the following:
Element 2
Element 19
Element 20
Element 21
Element 22
Element 23
Element 29
Element 30
Element 44
Element 57
Element 59
Element 60
Element 61
Element 62
Element 63
Element 64
Element 71
Element 78
Merge your layers
Open paper of choice and apply mask
Place your name where you like it
Add the Copyright and your License Number for the tube
Resize to your liking and save as PNG
This tutorial was created on December 23,2015 by Rhonda
Any resemblance to another Tag or Tutorial is purely coincidental
Wednesday, December 23, 2015
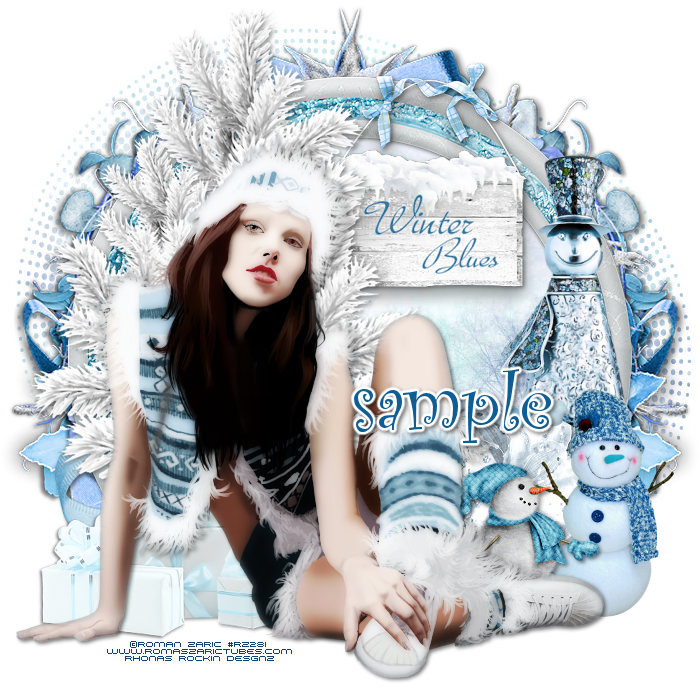
This tutorial is written for those with knowledge of PSP
Supplies Needed:
Tube of choice: I'm using the wonderful art work of Roman Zaric
You must obtain a license to use this art HERE
PTU Scrap Kit by Amalie Designs called Winter Blues
Kit can be purchased at Tiny Turtles Design HERE
Kit matches tube
Mask of choice
Ok Lets get Started:
This is a very quick and easy tutorial
Open element 25 & place to center of tag
Grab the magic wand & click inside frame
Selections modify expand by 10
Add new layer under frame
Open paper 23 & paste into selections
Select none
Place your tube
Now time to add our elements
I used the following:
Element 19
Element 20
Element 52
Element 53
Element 65
Element 122
Element 125
Element 135
Element 149
Merge your layers
Open paper of choice & apply mask
Place your name where you like it
Add the Copyright and your License Number for the tube
Resize to your liking and save as PNG
This tutorial was created on December 23,2015 by Rhonda
Any resemblance to another Tag or Tutorial is purely coincidental
This tutorial is written for those with knowledge of PSP
Supplies Needed:
Tube of choice: I'm using the wonderful art work of VeryMany
You must obtain a license to use their art HERE
FTU Scrap Kit by PinkParadox Productions HERE
Kit matches tube
Mask of choice
Ok Lets get Started:
This is a very quick and easy tutorial
Open frame 7 & place to center of tag
Grab the magic wand & click inside frame
Selections modify expand by 10
Add new layer under frame
Open paper 21 & paste into selections
Select none
Place your tube
Now time to add our elements
I used the following:
Element 6
Element 19
Element 20
Element 22
Element 25
Element 26
Element 36
Element 53
Element 58
Element 60
Element 62
Merge your layers
Open paper of choice & apply mask
Place your name where you like it
Add the Copyright and your License Number for the tube
Resize to your liking and save as PNG
This tutorial was created on December 23,2015 by Rhonda
Any resemblance to another Tag or Tutorial is purely coincidental
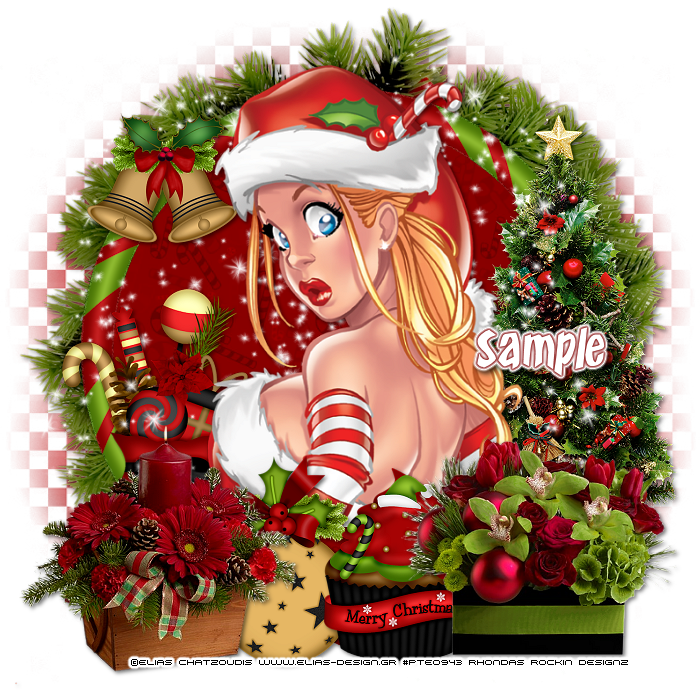
This tutorial is written for those with knowledge of PSP
Supplies Needed:
Tube of choice: I'm using the wonderful art work of Elias Chatzoudis
Tube was a gift when Elias was at PTE which has closed
You can find his tubes now at his store HERE
PTU Scrap Kit by Niqui's Designs called Xmas Wishes HERE
Mask of choice
Resize elements to your liking
Ok Lets get Started:
Open blank canvas 700x700
Open element 42 and place to center
Open element 47 and place on top of wreath
Using magic wand click inside frame
Selections modify expand by 10
Open paper 1 and paste as new layer
Selections invert delete
Move paper under frame
Place tube in center
Now time to add our elements of choice
I used the following:
Element 4
Element 11
Element 17
Element 26
Element 34
Element 40
Element 41
Element 44
Merge your layers
Open paper of choice & apply mask
Place your name where you like it
Add the Copyright and your License Number for the tube
Resize to your liking and save as PNG
This tutorial was created on December 23,2015 by Rhonda
Any resemblance to another Tag or Tutorial is purely coincidental
Tuesday, December 22, 2015

This tutorial is written for those with knowledge of PSP
Supplies Needed:
Tube of choice: I'm using the wonderful art work of Gene Gonzales
This tube was purchased at CILM which has closed
I'm not sure where this artist is selling at now
PTU Scrap Kit by Jens Sweet Temptations called Christmas Magic
You can purchase this kit at one of her stores HERE
Template #788 by Millie HERE
Mask #95 by Millie HERE
Ok Lets get Started:
Open template - Shift D to duplicate then close out original
Canvas size 675x675
Deleted copyright & word art
Click on raster 1 selections,select all, float,defloat
paste a paper of choice from the kit - I used paper6
selection invert delete
select none delete the original
Click on raster 2 selections,select all, float,defloat
paste a paper of choice from the kit - I used paper2
selection invert delete
select none delete the original
Click on raster 3 selections,select all, float,defloat
paste a paper of choice from the kit - I used paper4
selection invert delete
select none delete the original
Click on raster 5 selections,select all, float,defloat
paste a paper of choice from the kit - I used paper1
selection invert delete
select none delete the original
Click on raster 6 selections,select all, float,defloat
paste a paper of choice from the kit - I used paper8
selection invert delete
select none delete the original
Place your tube
Now time to add our elements
I used the following:
Bow
Candle
Cup
Cupcake 1
Decor 1
Frame 1&2
Gift 1
Lolli 2.3&4
Ornaments
Scroll
Sign
Stocking
Merge your layers
Open paper of choice and apply mask
Place your name where you like it
Add the Copyright and your License Number for the tube
Resize to your liking and save as PNG
This tutorial was created on December 22,2015 by Rhonda
Any resemblance to another Tag or Tutorial is purely coincidental
Thursday, December 17, 2015
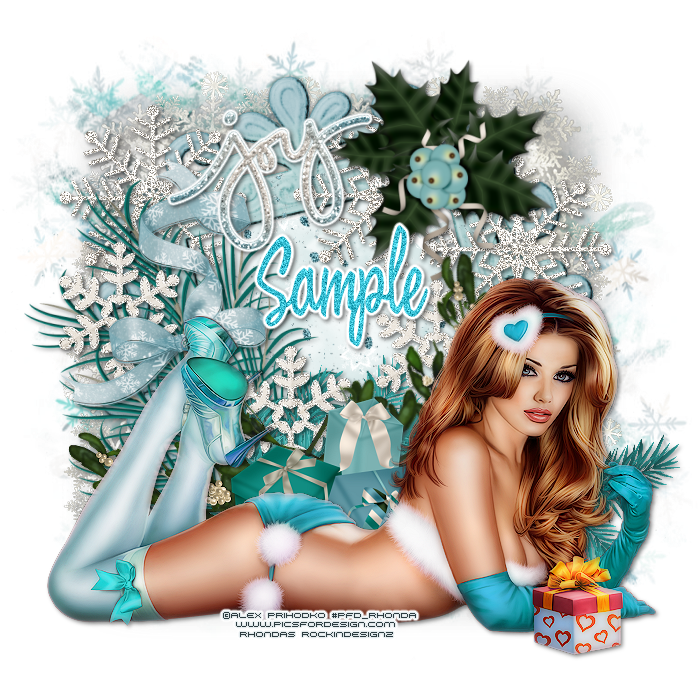
This tutorial is written for those with knowledge of PSP
Supplies Needed:
Tube of choice: I'm using the wonderful art work of Alex Prihodko
You must obtain a license to use his art HERE
Mask by Vix HERE
Ok lets get started:
This is a very quick and easy tutorial
Open element 17 & place in center of tag
Open element 14 and place on top
Grab the magic wand & click inside frame
Selections modify expand by 10
Add new layer under frame
Open paper 4 & paste into selections
Place your main tube
Now time to add our elements
I used the following:
Element 6
Element 10
Element 12
Element 13
Element 15
Element 19
Element 25
Element 27
Element 30
Merge your layers
Open paper of choice & apply mask
Place your name where you like it
Add the Copyright and your License Number for the tube
Resize to your liking and save as PNG
This tutorial was created on December 17,2015 by Rhonda
Any resemblance to another Tag or Tutorial is purely coincidental
Wednesday, December 16, 2015

This tutorial is written for those with knowledge of PSP
Supplies Needed:
Tube of choice: I'm using the wonderful art work of VeryMany
Which you must obtain a license to use HERE
PTU Scrap Kit by PinkParadox Productions HERE
Kit matches tube
Template #446 by Divine Intentionz HERE
Mask of choice
Ok lets get started:
Open template - Shift D to duplicate then close out original
Increase canvas size 700x700
Delete copyright,rectangle1,small square,circle 3&7,thin rectangles,rounded edge rect3,wordart & frame2
Click on square 1 selections,select all, float,defloat
paste a paper of choice from the kit - I used paper22
selection invert delete
select none delete the original
Click on square 2 selections,select all, float,defloat
paste a paper of choice from the kit - I used paper1
selection invert delete
select none delete the original
Click on rounded edge squares 1&2 selections,select all, float,defloat
paste a paper of choice from the kit - I used paper5
selection invert delete
select none delete the original
Click on rounded edge rectangle 1&2 selections,select all, float,defloat
paste a paper of choice from the kit - I used paper8
selection invert delete
select none delete the original
Click on circle 1 selections,select all, float,defloat
paste a paper of choice from the kit - I used paper13
selection invert delete
select none delete the original
Click on circle 2 selections,select all, float,defloat
paste a paper of choice from the kit - I used paper14
selection invert delete
select none delete the original
Click on circle 4 selections,select all, float,defloat
paste a paper of choice from the kit - I used paper9
selection invert delete
select none delete the original
Click on frame back 1 selections,select all, float,defloat
paste a paper of choice from the kit - I used paper3
selection invert delete
select none delete the original
Click on frame back 2 selections,select all, float,defloat
paste a paper of choice from the kit - I used paper18
selection invert delete
select none delete the original
Click on circle 8 selections,select all, float,defloat
paste a paper of choice from the kit - I used paper6
selection invert delete
select none delete the original
Click on circle 6 selections,select all, float,defloat
paste a paper of choice from the kit - I used paper11
selection invert delete
select none delete the original
Place your tube
Xero Porcelin with settings of choice
Now time to add our elements
I used the following:
Element 17
Element 19
Element 23
Element 29
Element 30
Element 31
Element 34
Element 56
Element 65
Element 66
Element 37
Element 73
Element 83
Merge your layers
Open paper of choice and apply mask
Place your name where you like it
Add the Copyright and your License Number for the tube
Resize to your liking and save as PNG
This tutorial was created on December 16,2015 by Rhonda
Any resemblance to another Tag or Tutorial is purely coincidental
Tuesday, December 15, 2015
This tutorial is written for those with knowledge of PSP
Supplies Needed:
Tube of choice: I'm using the wonderful art work of Keith Garvey
You must obtain a license to use HERE
FTU Scrap Kit by Kittz Kreationz HERE
Template #1 by ACDiva's HERE
Mask of choice
Ok lets get started:
Open template - Shift D to duplicate then close out original
Canvas size 700x700
Delete copyright,layers 13-16 and all dotted circles
Click on layer 5&6 selections,select all, float,defloat
paste a paper of choice from the kit - I used paper1
selection invert delete
select none delete the original
Click on layer 7,8,10 &12 selections,select all, float,defloat
add new layer and flood fill with color of choice
select none delete the original
add noise
Click on layer 9 selections,select all, float,defloat
paste a paper of choice from the kit - I used paper3
selection invert delete
select none delete the original
Click on layer 11 selections,select all, float,defloat
paste a paper of choice from the kit - I used paper4
selection invert delete
select none delete the original
Click on layers 7&8 selections,select all, float,defloat
paste a paper of choice from the kit - I used paper4
selection invert delete
select none delete the original
Place tube to bottom
Now time to add our elements
I used the following:
Element 8
Element 10
Element 13
Element 18
Element 19
Element 20
Element 21
Element 23
Element 24
Element 28
Element 29
Element 32
Element 33
Element 49
Element 52
Element 53
Merge layers
Open paper of choice and apply mask
Place your name where you like it
Add the Copyright and your License Number for the tube
Resize to your liking and save as PNG
This tutorial was created on December 15,2015 by Rhonda
Any resemblance to another Tag or Tutorial is purely coincidental
This tutorial is written for those with knowledge of PSP
Supplies Needed:
Tube of choice: I'm using the wonderful art work of Misticheskaya
You must obtain a license to use HERE
FTU Scrap Kit by Jens Sweet Temptations HERE
Mask #3 by Tika HERE
Ok lets get started:
This is a very quick and easy tutorial
Just place your elements where you want them
Open blank canvas 700x700
I started by placing my tube in center
Then I started adding elements around her
I used the following:
Bag
Bag 3
Gift 1-4
Ornament
Ornament 3
Ornaments
Ornaments 2
Snow
Wreath
Merge your layers
Open paper of choice & apply mask
Place your name where you like it
Add the Copyright and your License Number for the tube
Resize to your liking and save as PNG
This tutorial was created on December 14,2015 by Rhonda
Any resemblance to another Tag or Tutorial is purely coincidental
Wednesday, December 9, 2015

This tutorial is written for those with knowledge of PSP
Supplies Needed:
Tube of choice: I'm using the wonderful art work of VeryMany
Which you must obtain a license to use at PFD HERE
PTU Scrap Kit by Lizquis Scraps called Santa Hat
You an purchase this awesome kit from S&CO HERE
Template #2 by sylly creations HERE
Mask of choice
Ok Lets get Started:
Open template - Shift D to duplicate then close out original
Increase canvas size 700x700
Delete copyright
Click on red square left selections,select all, float,defloat
paste a paper of choice from the kit - I used paper10
selection invert delete
select none delete the original
Click on red square right selections,select all, float,defloat
paste a paper of choice from the kit - I used paper4
selection invert delete
select none delete the original
Click on large green square selections,select all, float,defloat
paste a paper of choice from the kit - I used paper8
selection invert delete
select none delete the original
Click on large white square selections,select all, float,defloat
add new layer and apply color of choice
select none delete the original
apply noise
Click on large red square selections,select all, float,defloat
paste a paper of choice from the kit - I used paper2
selection invert delete
select none delete the original
Click on black rectangle selections,select all, float,defloat
paste a paper of choice from the kit - I used paper3
selection invert delete
select none delete the original
On small green square
I applied Xero Fritillary
Click on 3 red square selections,select all, float,defloat
paste a paper of choice from the kit - I used paper9
selection invert delete
select none delete the original
Click on red circle selections,select all, float,defloat
paste a paper of choice from the kit - I used paper7
selection invert delete
select none delete the original
Place your tube
Xero Porcelin with settings of choice
Now time to add our elements
I used the following:
Bell
Boot
Candy 2
Decor 1
Lollipop 1&2
Mouse
Ornaments
Presents
Sack
Snow 2
Snowflakes 1
Tree
Merge your layers
Open paper of choice and apply mask
Place your name where you like it
Add the Copyright and your License Number for the tube
Resize to your liking and save as PNG
This tutorial was created on December 9,2015 by Rhonda
Any resemblance to another Tag or Tutorial is purely coincidental

This tutorial is written for those with knowledge of PSP
Supplies Needed:
Tube of choice: I'm using the wonderful art work of Barbara Jensen
You must obtain a license to use HERE
PTU Scrap Kit by Jens Sweet Temptations called Christmas Wonders
This kit can be purchased at one of her stores HERE
Template #4 by sylly creations HERE
Mask of choice
Ok Lets get Started:
Open template - Shift D to duplicate then close out original
Increase canvas size 700x700
Delete copyright,dotted cicles
Click on small red rectangle selections,select all, float,defloat
add new layer and flood fill with color of choice
select none delete the original
apply Filters Unliminted any texture of choice
Click on black rectangle selections,select all, float,defloat
add new layer and flood fill with color of choice
select none delete the original
apply Filters Unliminted any texture of choice
Click on large red rectangle selections,select all, float,defloat
paste a paper of choice from the kit - I used paper2
selection invert delete
select none delete the original
I added a border with noise
Click on green circle selections,select all, float,defloat
paste a paper of choice from the kit - I used paper3
selection invert delete
select none delete the original
Click on top and bottom black squares selections,select all, float,defloat
add new layer and flood fill with color of choice
select none delete the original
add noise to paper
also added a border to my squares with noise
Add close-up of tubes in squares
apply Xero Porcelin and Radiance
On all the word art I just changed colors to match my tube
Place your tube
Xero Porcelin with settings of choice
Now time to add our elements
I used the following:
Bear
Bells 1
Bing 1&2
Candy 2
Gift 1
Gifts 1&2
Light Strand
Reindeer
Wreath
Merge your layers
Open paper of choice and apply mask
Place your name where you like it
Add the Copyright and your License Number for the tube
Resize to your liking and save as PNG
This tutorial was created on December 9,2015 by Rhonda
Any resemblance to another Tag or Tutorial is purely coincidental
Subscribe to:
Posts
(Atom)
Grab My Blinkie

I CT For


Blogs I Visit


