Friday, June 30, 2023
This tutorial is written for those with knowledge of PSP
Supplies Needed:
Tube of choice: I'm using the wonderful artwork of Sheokate
Tube was included in kit when purchased at PFD
PTU Kit by Designz by Anorie called Cherry Pop Beach
Kit can be purchased at her store HERE
WA at Creative Attitude HERE
Scroll down, posted 7/13/17
Mask of choice

Ok let's get started:
Open blank canvas 725x725
Open element 50, place to left
Choose paper of choice and place behind frame
Place tube to right side
Start adding elements of your choice

I used the following:
Element 2
Element 3
Element 11
Element 15
Element 16
Element 17
Element 20
Element 31
Element 38
Element 40
Element 41
Element 44
Element 46
Element 47
Element 54
Element 94
Element 103

Apply mask and WA of choice

Place your name where you like it
Add the Copyright and your License Number for the tube
Resize to your liking and save as PNG
This tutorial was created on June 30,2023 by Rhonda
Any resemblance to another Tag or Tutorial is purely coincidental


This tutorial is written for those with knowledge of PSP
Supplies Needed:
Tube of choice: I'm using the wonderful art work of Amber
Tube was purchased at VMA HERE
PTU kit by Jens Sweet Temptations called Sun,Heat and Fun 
Kit can be purchased at her store HERE
WA of choice
Mask of choice

Ok lets get started:
Open 725x725 canvas
Place tube of choice to tag
I placed element 24 and 78 to canvas
I used these as a base then started adding elements

Use elements of choice from kit. I used the following:
Element 2
Element 5
Element 7
Element 9
Element 15
Element 17
Element 21
Element 26
Element 43
Element 44
Element 45
Element 53
Element 57
Element 58
Element 70
Element 82

Apply mask and WA

Place your name where you like it
Add the Copyright and your License Number for the tube
Resize to your liking and save as PNG
This tutorial was created on June 30,2023 by Rhonda
Any resemblance to another Tag or Tutorial is purely coincidental


Thursday, June 29, 2023

This tutorial is written for those with knowledge of PSP
Supplies Needed:
Tube of choice: I'm using the wonderful art work of Grianna
Tube was purchased at Elegancefly HERE
FTU Cluster frame by JLKINSPIRED Creations HERE
Cluster posted June 28
PTU Kit by Tiny Turtle Designs called Camerona HERE
WA from Stonemommy4 Designs HERE
Mask #6 & #1 by TK Dezigns HEREHERE

Ok lets get started:
Open cluster, shift D to duplicate and close original
Apply tube of choice to tag

Use elements of choice from kit. I used the following:
Element 1
Element 5
Element 8
Element 12
Element 16
Element 19
Element 20
Element 24
Element 31
Element 32
Element 39
Element 43
Element 90

Apply WA 
I used 2 masks with 2 papers

Place your name where you like it
Add the Copyright and your License Number for the tube
Resize to your liking and save as PNG
This tutorial was created on June 29,2023 by Rhonda
Any resemblance to another Tag or Tutorial is purely coincidental


This tutorial is written for those with knowledge of PSP
Supplies Needed:
Tube of choice: I'm using the wonderful artwork of Elias Chatzoudis
Tube was purchased at CDO HERE
FTU kit Beach Summer HERE
Collab Template by Debb & Ladybug found at Creative Misfits HERE
Mask of choice

Ok lets get started:
Open template, shift D to duplicate and close original
Increase canvas to 725x725
Delete copyright, wordart, dotted bars, bar 2, raster 4, square 2
Use papers from kit to fill template layers
Use my tag as a guide if needed
Place tube of choice to tag

Use elements of choice from kit. I used the following:
Element 9
Element 14
Element 20
Element 21
Element 25
Element 27
Element 29
Element 33
Element 46
Element 49
Element 57
Element 63
Element 71
Element 73

Apply mask

Place your name where you like it
Add the Copyright and your License Number for the tube
Resize to your liking and save as PNG
This tutorial was created on June 29,2023 by Rhonda
Any resemblance to another Tag or Tutorial is purely coincidental


Tuesday, June 27, 2023
This tutorial is written for those with knowledge of PSP
Supplies Needed:
Tube of choice: I'm using the wonderful artwork of Misticheskaya
Tube was purchased at her store HERE
PTU kit by Jen Sweet Temptations called Rocket Party
I am so happy to announce Jen has opened her own store!!!!!!!!!!!!!
Check it out HERE
Kit HERE
WA from Pimpin' PSPers HERE
Sparkles from kit used as mask

Ok lets get started:
Open canvas 725x725
Place tube to left hand side
Open element 57, resize and mirror
Place behind main tube
Open element 77, resize and place in front of truck
This was my base to start adding elements

Use elements of choice from kit. I used the following:
Element 4
Element 5
Element 6
Element 8
Element 10
Element 27
Element 34
Element 47
Element 50
Element 54
Element 55
Element 58
Element 61
Element 62
Element 64
Element 69
Element 78
Element 82
Element 87
Element 89
Element 94
Element 97
Element 100

Place your name where you like it
Add the Copyright and your License Number for the tube
Resize to your liking and save as PNG
This tutorial was created on June 26,2023 by Rhonda
Any resemblance to another Tag or Tutorial is purely coincidental.

Friday, June 23, 2023

This tutorial is written for those with knowledge of PSP
Supplies Needed:
Tube of choice: I'm using the wonderful art work of Tony Tzanoukakis
Tube was purchased at his store HERE
FTU kit by Addictive Pleasures called USA 2010 HERE
Scroll to bottom of page
Template #25 by Denz Designz HERE
Link can be found on right hand side near bottom
Mask of choice

Ok lets get started:
Open template, shift D to duplicate and close original
Increase all layer sizes to your liking
Delete top copyright layer
On the 3 star layers of template I applied star element from kit
Resize and rotate star to your liking (I followed templated)
Delete star layers from template
Open star 2 from kit and place behind star
Resize and again rotate to your liking
I added more noise to my stars
Do this for all 3 layers 
Use papers from kit to fill backs and frames
Place tube of choice to canvas 

Use elements of choice from kit. I used the following:
Banner
Cap
Chain
Clip
Fireworks
Fireworks2
Heart
Tag 2
Text

Apply Mask of choice

Place your name where you like it
Add the Copyright and your License Number for the tube
Resize to your liking and save as PNG
This tutorial was created on June 23,2023 by Rhonda
Any resemblance to another Tag or Tutorial is purely coincidental

Sunday, June 18, 2023

This tutorial is written for those with knowledge of PSP
Supplies Needed:
Tube of choice: I'm using the wonderful art work of Zlata
Tube was purchased at her store HERE
PTU kit by Designz by Anorie called American
Kit can be purchased at one of her stores HERE
Template by Deb found at Creative Misfits Creations HERE
WA by Sylly Creationz HERE
Mask by Kathy at EFR blog (top mask) HERE

Ok lets get started:
Open template, shift D to duplicate and close original
Increase canvas to 725x725
Delete top layer, layer 5&6
Use papers from kit to fill layers 1,3 and 7
Layers 2&4, add noise with settings of choice
Place tube of choice to canvas tag

Use elements of choice from kit. I used the following:
Element 1
Element 8
Element 9
Element 11
Element 13
Element 14
Element 18
Element 23
Element 25
Element 52
Element 59
Element 60
Element 65

Apply WA & mask

Place your name where you like it
Add the Copyright and your License Number for the tube
Resize to your liking and save as PNG
This tutorial was created on June 18,2023 by Rhonda
Any resemblance to another Tag or Tutorial is purely coincidental

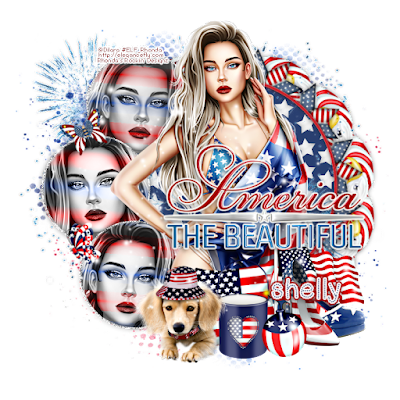
This tutorial is written for those with knowledge of PSP
Supplies Needed:
Tube of choice: I'm using the wonderful art work of Dilara
Tube was purchased at Elegancefly HERE
FTU kit by Designz by Shelly called America HERE
Template found at Escape From Reality Blog HERE
Mask from kit

Ok lets get started:
Open template, shift D to duplicate and close original
Increase canvas to 725x725, delete WA
Click on large frame background and apply paper of choice
Large frame add noise
On bottom, medium and small backgrounds I used a gradient
On the frames I also added noise
Place tube you are using to template
On the 3 outside circles I added close-up of tube
Changed opacity to Luminance
Apply any filters of choice

Use elements of choice from kit. I used the following:
Element 43 - create a cluster and move to right side
Element 45 - create a cluster also to right side
Element 3
Element 8
Element 9
Element 14
Element 22
Element 25
Element 37
Element 80
Element 81
Element 87
Element 91
Element 98
Element 104

Place your name where you like it
Add the Copyright and your License Number for the tube
Resize to your liking and save as PNG
This tutorial was created on June 18,2023 by Rhonda
Any resemblance to another Tag or Tutorial is purely coincidental

Grab My Blinkie

tk-Rhondas-Designz-blinkie

About Me

Hello friends and welcome to my blog!!! My name is Rhonda and I live in South East Ga., little town called Lumber City. I have 2 sons, 2 DIL's and 3 grandchildren. I work in healthcare as an RN.

When not working, I enjoy playing in PSP. It has been my passion over 20 years. PSP is relaxing and takes my mind away from troubles of life. I enjoy writing tutorials on my downtime.

I am expanding my creations to frames, clusters, templates and hopefully masks. I have NEVER made a mask but I have the time to learn now and I am excited. These will be FTU, all I ask is please download from the blog and if you are in a group or forum please send others to my blog and DO NOT HOTLINK. I would love to see your creations and show them off.

If you need to contact me with any questions concerning my tutorials or creations, send me an email. I am aware some of my older tutorials have links that are no longer working due to designers closing their blog. This is beyond my control. I am unable to share anything which was not shareable before. I honor all designers TOU.

I CT For

I don't CT that much any longer but these are designers who allow me to use their kits as show-off's.
Photobucket
Photobucket
Photobucket
Photobucket

T.O.U.

All tutorials that are on my blog have been written by me. Any resemblance to another tag or tutorial is purely coincidental. Please do not copy and claim as your own. You are welcome to use these tutorials in any groups or forums but please link back to my blog. I would love to see any tag that is made using my tutorial. If you have any questions or concerns you can contact me at rsheath31549@yahoo.com.

Cluster Frames are Personal Use ONLY!!!! Please do not claim them as your own or rip them apart. You are welcome to use in forums or groups but please link back to blog. My TOU are included in the downloads. I would love to see any creations you make with my tuts or other creations. Send them to me and I will display them.

My goal for this blog is to make creations others can use and enjoy. I want to focus on being positive through difficult times. Show importance of accepting others, no judging, just respect. Showing kindness to others can change another's life, even for a brief time
Powered by Blogger.

Search

Blogs I Visit

Photobucket
Photobucket
Photobucket
Photobucket
Photobucket
Photobucket
Photobucket
Photobucket
Photobucket

Blog Archive

Followers