Ok Let's get Started:Open 700x700 canvasOpen element 65, resize and place to centerAdd paper of choice from kit under frameOpen tube of choice and place to canvas
Start building your tag with other elements from kitI used the following:Element 1Element 4Element 5Element 12Element 13Element 14Element 15Element 19Element 21Element 28Element 33Element 36Element 46Element 69Element 75
Apply WAMerge layers or keep openAdd mask of choice
Place your name where you like itAdd the Copyright and your License Number for the tubeResize to your liking and save as PNGThis tutorial was created on April 30,2023 by RhondaAny resemblance to another Tag or Tutorial is purely coincidental

Ok Let's get Started:Open template, Shift D to duplicate and close originalI resized my canvas to 700x700Delete top 15 layers and staplesWe'll start at bottom and work upBG Square - rotate 90 to right & move downPaper 9Doily BG - Paper 10Doily - Paper 7Rectangle 1&2 - Background paperRectangle 1&2 bg - Paper 1 and add noise
Open tube of choice and place on canvas
Start building your tag with other elements from kitI used the following:BeadsCalla LilyCherub 1&2ClockfaceCloudDiamond StarDoveFrameHeart RibbonLeavesMusic NotesPlantRay of LightRoses 1&2SparklesStringTullenetting
Keep layers open or mergeOpen paper 3 and apply mask 314Duplicate this layer until satisfied with colorOpwn paper 6 and apply mask 234Duplicate the same
Place your name where you like itAdd the Copyright and your License Number for the tubeResize to your liking and save as PNGThis tutorial was created on April 27,2023 by RhondaAny resemblance to another Tag or Tutorial is purely coincidental
This tutorial is written for those with knowledge of PSPSupplies Needed:Tube of choice: I'm using the wonderful artwork of Caron VinsonTube purchased at CDO HEREMatching PTU kit by Whisprd Dreamz also purchased at CDO HEREMask of choice
Ok Let's get Started:Open canvas 700x700Open element 11 and place to centerResize and rotate 90 to leftClick inside middle of frame and expand 15Open new layer under frame and keep selectedOpen paper of choice and paste into selection, deselect
Open tube of choice and place on canvas
I used Mura's Meister Copies Filter for everything behind frameI'll tell which elements I used starting at bottom working up- Element 16- Element 12- Element 13- Element 24- Element 6- Element 15
Start building your tag with other elements from kitI used the following:Element 1Element 2Element 4Element 10Element 14Element 17Element 22Element 23Element 25
Keep layers open or mergeAdd paper of choice and apply mask
Place your name where you like itAdd the Copyright and your License Number for the tubeResize to your liking and save as PNGThis tutorial was created on April 26,2023 by RhondaAny resemblance to another Tag or Tutorial is purely coincidental

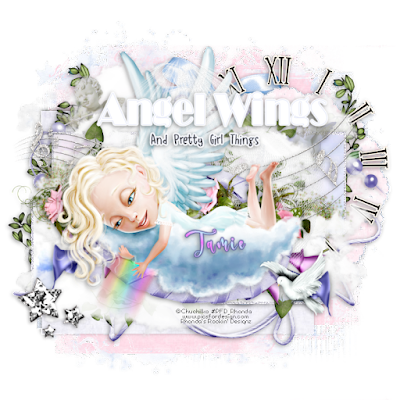
This tutorial is written for those with knowledge of PSPSupplies Needed:Tube of choice: I'm using the wonderful artwork of Ellie_MilkTube purchased at PFD HEREFTU kit by Tamie at Addictive Pleasures "Rebel Doll" HERETemplate #1 by Pammers HEREStar mask of choice I used masks by Dee but her blog has closed
Ok Let's get Started:Open template, shift D to duplicate and close originalDelete copyright, layers 3&4We'll start at bottom and work upLayer 1 - Paper of choiceLayer 2 - Add hearts 3&4Add ribbon, duplicate and move downLayer 5 - Open 8Layer 6 - I used a gradient & added noiseLayer 7 - Paper 7Layers 8&10 - Used color black & added noiseLayer 9 - Paper 1
Open tube of choice to canvas
Use any elements from kit to complete your tagI used:KissSparklesStarStar 2TextWire
Add mask of choice
Place your name where you like itAdd the Copyright and your License Number for the tubeResize to your liking and save as PNGThis tutorial was created on April 23,2023 by RhondaAny resemblance to another Tag or Tutorial is purely coincidental
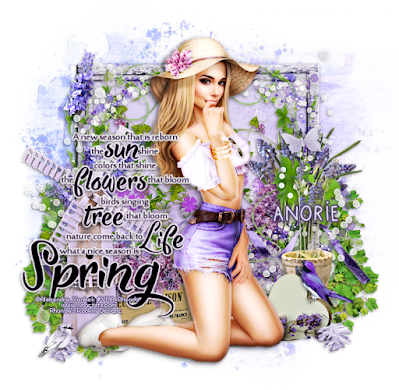
This tutorial is written for those with knowledge of PSPSupplies Needed:Tube of choice: I'm using the wonderful artwork of Alex PrihodkoTube purchased from PFD HERE FTU Spring Wedding by Melissaz Creationz HERE WA by Venomous Cherries Creations HERE Mask of choice
Ok Let's get Started:Open 700x700 canvasOpen element 22, paste to centerClick inside with magic wandSelection modify expand 15Open paper of choice from kit and paste under frame
Elements behind frame:Open element 03, resize around 45%Using MuRa's Meister Encircle filter to place behind frameOpen element 13 and place around cluster made
Other elements used:Element 7Element 10Element 11Element 19Element 27Element 28Element 29Element 34Element 35Element 37
Open tube of choice and place on canvasAdd WA of choice
Merge layers or keep openOpen paper of choice and apply mask
Place your name where you like itAdd the Copyright and your License Number for the tubeResize to your liking and save as PNGThis tutorial was created on April 22,2023 by RhondaAny resemblance to another Tag or Tutorial is purely coincidental
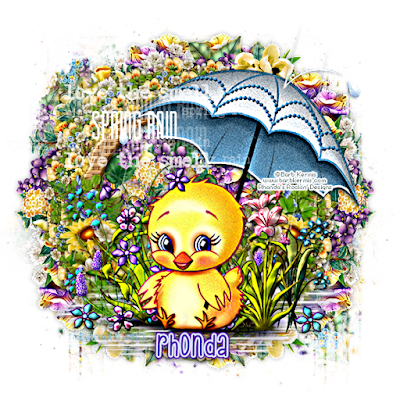
This tutorial is written for those with knowledge of PSPSupplies Needed:Tube of choice: I'm using the wonderful artwork of Barb KermisSite has closed. Use any tube of choice2 random clusters found on internet HERE If these are yours please let me know so credit can be given WA by Danni found at Creative Misfits HERE Mask of choice
Simple and easy tutorial
Ok Let's get Started:Open 700x700 canvasOpen purple cluster and paste to new canvasOpen yellow cluster and paste on topGo back to your purple cluster and move to leftLayers duplicate, image, arrange to right sideI played around with this until I got to my likingResize yellow cluster to your likingOpen tube of choice and place on canvasAdd WA of choiceMerge layers and add maskI used the purple clusterMuRa's Meister Copies, WallpaperAdd mask of choice
Place your name where you like itAdd the Copyright and your License Number for the tubeResize to your liking and save as PNGThis tutorial was created on April 21,2023 by RhondaAny resemblance to another Tag or Tutorial is purely coincidental
This tutorial is written for those with knowledge of PSPSupplies Needed:Tube of choice: I'm using the wonderful artwork of GoldwasserTube was included in kit when purchasedMatching PTU kit by Cattys Creations purchased at PFD HEREMask from kit
Ok Let's get Started:Open new image 725x725 canvasOpen element 5 and resize to likingOpen element 85, resize and place in front of doorwayOpen tube of choice and place on canvas(There are 4 tubes in kit)
Start building your tag with other elements from kitI used the following:Element 75Element 77Element 83Element 84Element 6Element 41Element 43Element 50Element 53Element 54Element 57Element 59Element 61Element 67Element 73Element 74Element 16Element 17Element 19Element 30Element 35
Apply mask of choice from kit
Place your name where you like itAdd the Copyright and your License Number for the tubeResize to your liking and save as PNGThis tutorial was created on April 12,2023 by RhondaAny resemblance to another Tag or Tutorial is purely coincidental
This tutorial is written for those with knowledge of PSPSupplies Needed:Tube of choice: I'm using the wonderful artwork of Sybile ArtTube was purchased at CDO HEREMatching PTU kit by Kissed by Kelz purchased at HEREMask of choice
Ok Let's get Started:Open new image 725x725 canvasOpen element 25 and resize 70%Using Mura's Meister Encircle filter, make framePlace to left side of tagDuplicate, mirror to right side(You can better fit this at end)Open element 35 and repeat like element 25Open tube of choice and place on canvas
Start building your tag with other elements from kitI used the following:Element 2Element 3Element 4Element 6Element 7Element 8Element 9Element 11Element 12Element 13Element 14Element 15Element 20Element 22Element 26Element 27Element 30Element 31Element 32Element 33Element 34Element 38Frame 1WA 2
I keep my layers openI used 2 papers and applied same mask of choice
Place your name where you like itAdd the Copyright and your License Number for the tubeResize to your liking and save as PNGThis tutorial was created on April 12,2023 by RhondaAny resemblance to another Tag or Tutorial is purely coincidental
This tutorial is written for those with knowledge of PSPSupplies Needed:Tube of choice: I'm using the wonderful artwork of Zlata_MTube was purchased at her store HEREFTU kit by Designz By Shelly HEREWordArt by Dragonfly Dreams HEREMask of choice
Ok Let's get Started:Open new image 725x725 canvasOpen element 109, resize around 68%Place to upper right of canvasOpen element 32 resize 80% and place to left of canvasOpen element 27 and place behind the arch (resize)Open element 111 and place to center Place tube to center
Start building your tag with other elements from kitI used the following:Element 14Element 17Element 21Element 33Element 34Element 35Element 36Element 43Element 55Element 64Element 87Element 89Element 90Element 91Element 95Element 104Element 105Element 106Place WA to liking
Open paper of choice and apply mask
Place your name where you like itAdd the Copyright and your License Number for the tubeResize to your liking and save as PNGThis tutorial was created on April 13,2023 by RhondaAny resemblance to another Tag or Tutorial is purely coincidental
This is a very short tutorialI'll give you links to supplies I usedYou can do so many different things with clusters
Tube VeryMany HERECluster from Buzzy Hive HERE2 papers used came from Deviant Art free suppliesI only changed the colors HEREDo a search for free papersMask and WA of your choice
Add copyright for tubeWritten April 11, 2023
This tutorial is written for those with knowledge of PSPSupplies Needed:Tube of choice: I'm using the wonderful artwork of Sara Butcher-BullierTube can be purchased at CDO HEREFTU elements by G&T Blogspot HEREScroll to bottom for downloadMask of choice
This is full size so resize to your liking
Ok Let's get Started:Open 725x725 canvasOpen notepad, place behind cluster and resizeUsing deform tool shift a little to leftOpen pink flower, place to right and resizeOpen white flower, place beside pink, more to leftDupicate flower, flip and place toward bottomOpen cluster, resize to your likingNow can arrange how you want your layersAdd tube of choice
Open paper and add mask of choice
Place your name where you like itAdd the Copyright and your License Number for the tubeResize to your liking and save as PNGThis tutorial was created on April 1,2023 by RhondaAny resemblance to another Tag or Tutorial is purely coincidental


